
Security Roles
Contents:
- Overview of Security Roles
- Creating a Basic Security Role
- Using Apply based on Filter Settings
- Advanced Usage of Filter Rules
- Usage of Code Paths
- Recommended creation and editing settings
- Summary
Overview of Security Roles
Security roles are functionality added in Sharperlight 5.2, adding soft security in the form of limiting which records a user can access based on rules defined that apply to the user and/or the user groups they belong to.
An example of using this is limiting employees to only view data that belongs to their department by creating a security role over the department’s code and adding the user group for that department to the user groups the security role applies to.
Security roles has an opt-in approach, to preserve the integrity of legacy reports.
Note that if a security role is created or enabled while a user is logged in, it will not be applied to that user’s session. The user will be required to log out and log back in for the security role to take effect. This is to preserve the integrity of reports that are running as a security role is created.
While testing a security role, it is recommended to create a test account and include it in the users the security role applies to.
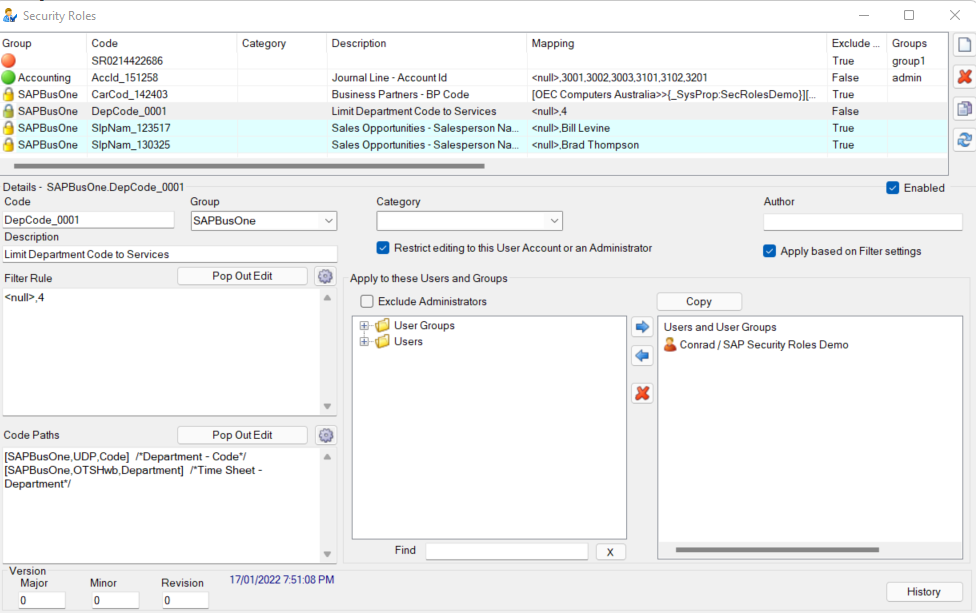
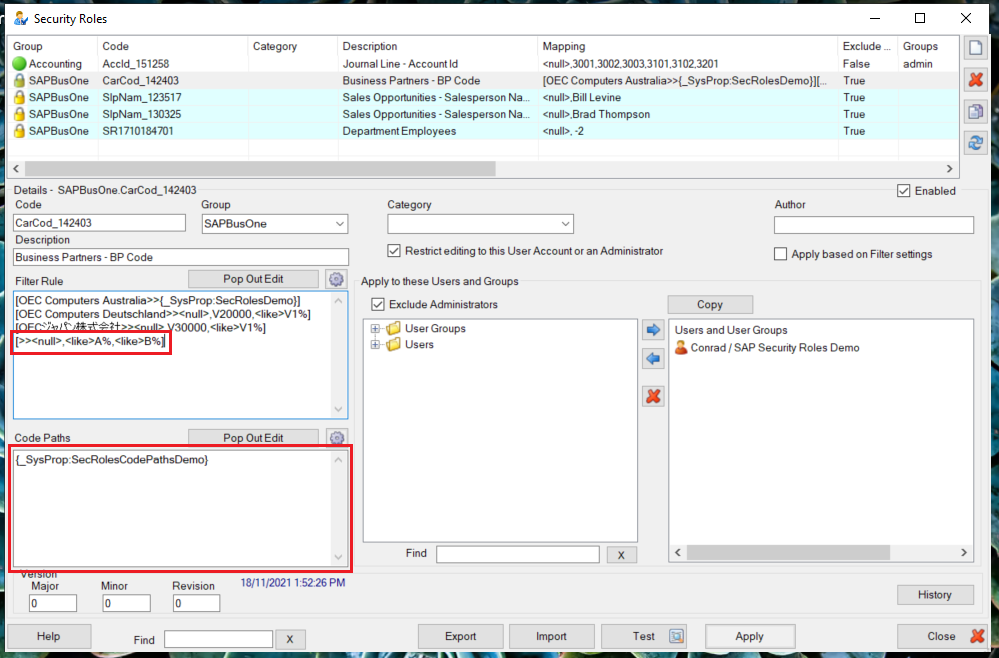
The Security Roles window has several main features:
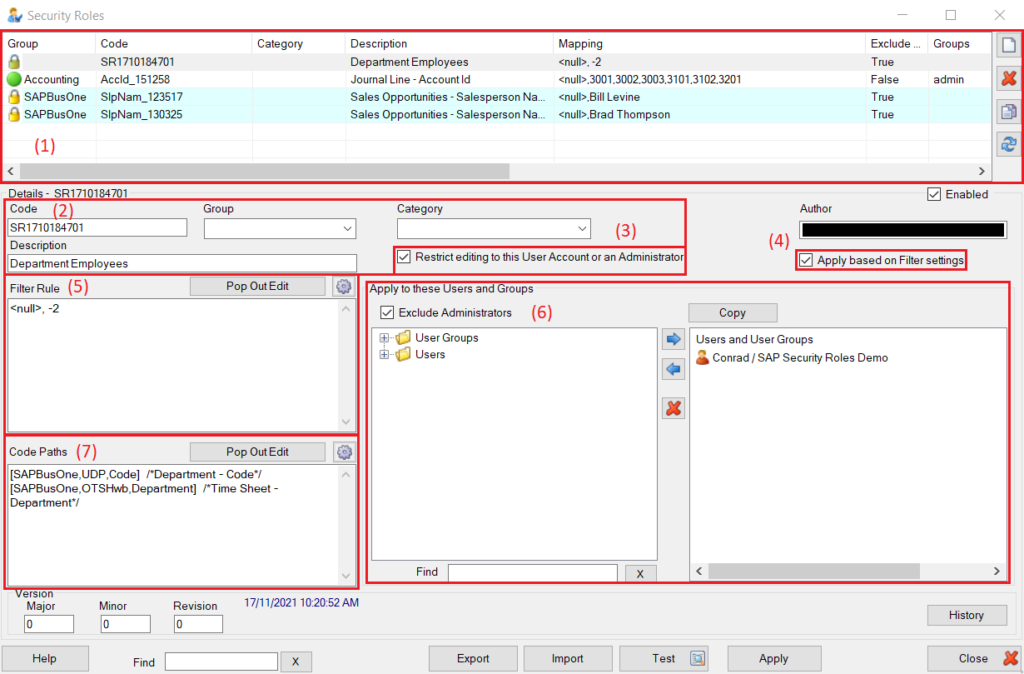
- This panel shows the security roles that have been created. The icon on the left is a lock if the option ‘Restrict editing to this User Account or an Administrator’, and the row is blue if ‘Apply based on Filter Settings’ is enabled. The buttons on the right buttons are used to create new security roles, delete the selected security role, copy the selected security role, and refresh security roles.
- The Security Role’s Code, Group, Category and Description are edited here. The Code should be Unique and Meaningful, and the other fields should be accurate.
- Enabling ‘Restrict editing to this User Account or an Administrator’ means that only the creator or Administrators can edit the record. It is generally good practice to enable this, as otherwise any user with access to the Security Roles window could simply remove themselves from the list and view data they shouldn’t.
- Enabling ‘Apply based on Filter Settings’ means that in queries, if the filter ‘Security Roles’ is set to ‘Y’, the security role is applied. Otherwise, it is not.
- The Filter Rules are defined here. The associated users and groups will be restricted to the list of values defined in the filter rules. The filter rules allow for the special values <null> and <blank>, allow for <like> with the wildcard %, can be delimited with either pipes (|) or commas (,), support conditional mapping and support system properties. This will be covered in more detail later in the article.
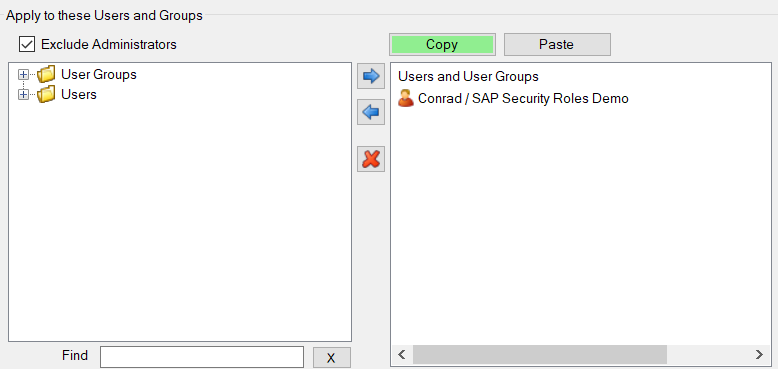
- This section of the window is where the users that the security role applies to are defined. The panel on the left is a list of the User Accounts and User Groups as defined in Site Setup, and the panel on the right is the list of Users and User Groups that the role will apply to. The checkbox ‘Exclude Administrators’ is used to prevent Administrators who may be in one of the User Groups from having access to reduced data. The copy button copies the current configuration of the Users and User groups that the security role will apply to.
- The code paths are used to define the product, table and field that the roles will be applied to. Once the Code Paths have been applied, the field’s icon will be changed in query builder to signify that it has a Security Role applied to it. Multiple Locations can be defined through a comma delimited list, and System Properties can be used. This will be covered in more detail later.
Creating a Basic Security Role
This section of the article will describe the basics of creating a new Security Role and the basic configuration of the created security role.
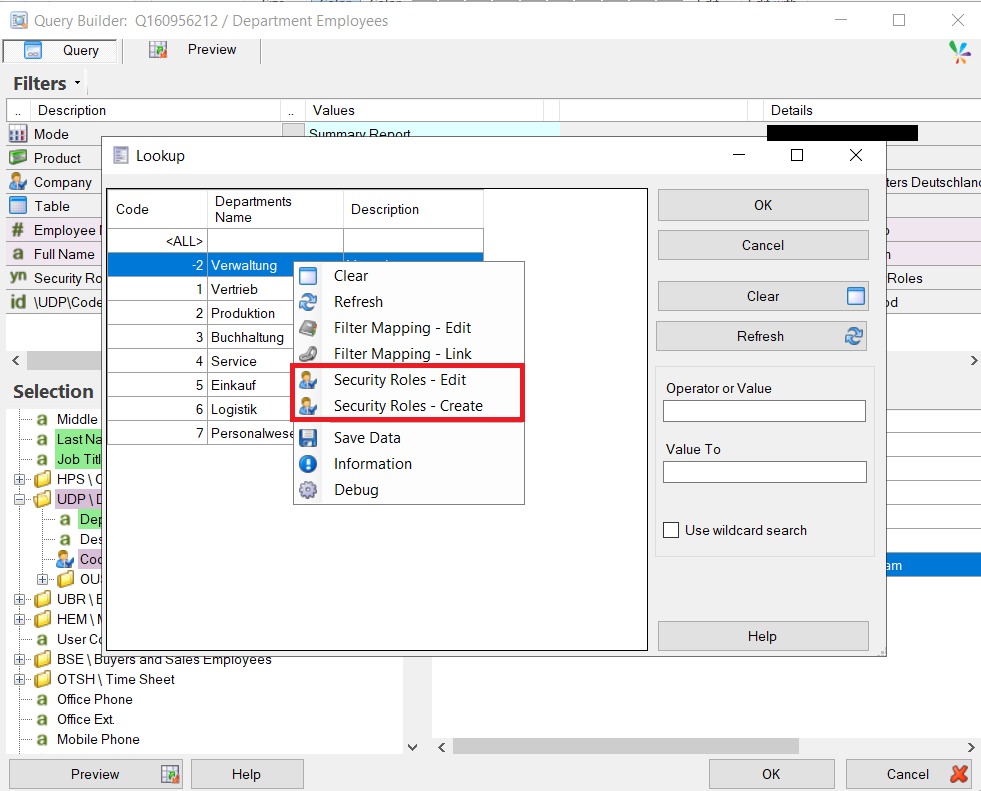
There are several methods to create a new Security Role. The easiest is to open a Filter’s Lookup in Query builder, select the value(s) that you want to allow in the security role, right click one of them and select ‘Security Roles – Create’. This is the recommended method, as it pre-populates the Code, Author, Filter Rule and Code Path sections of the new Security Role, providing a good starting point.
Another way is to create a new Security Role through the Security Roles window. This will require manual population of the Code, Filter Rule and Code paths.

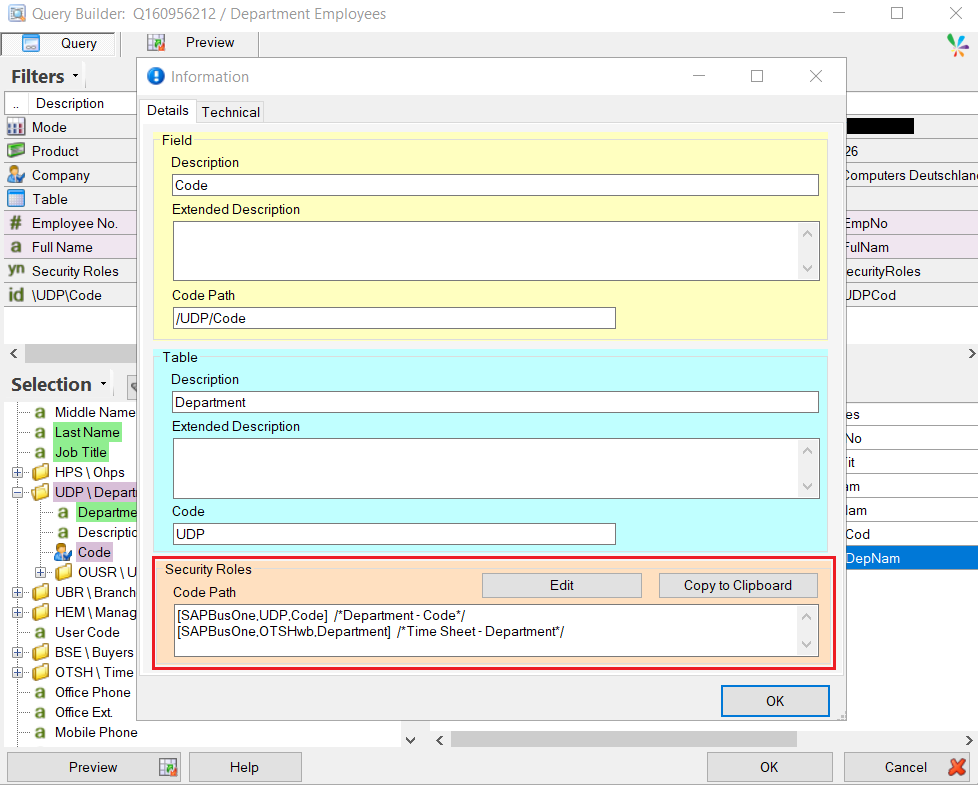
If this method is followed, the code paths of a field can be found in query builder by right clicking on a field and selecting Information. Once copied from Query Builder, these can be pasted into the Code Paths section of the new Security Role.
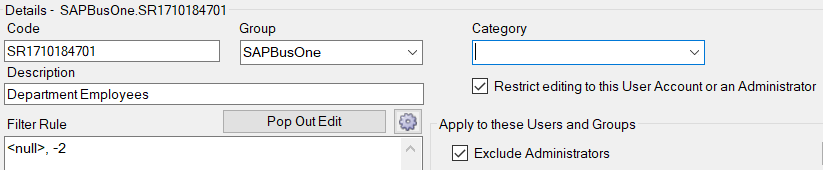
Once this is completed, the Security Role must be further configured. Set the Group, Category, Description and change the code if necessary. Usually, the ‘Restrict editing to this User Account or an Administrator’ checkbox would be used, as well as the ‘Exclude Administrators’ checkbox. These are used to prevent other users modifying the security role to allow themselves to view data they shouldn’t.
Once this is completed, the Users the rule applies to should be configured. This is accomplished through selecting the user in the left panel, then pressing the right arrow. Alternatively, a pre-configured Security Role can have the users copied and pasted into the new role.
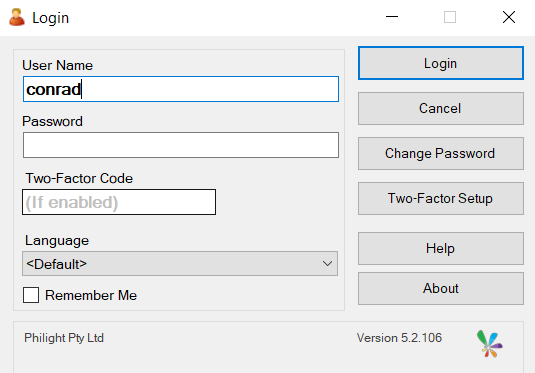
To test the security role, login as one of the users the security role applies to. For testing, this can be accomplished by holding shift as Query Builder is opened from the applications menu.
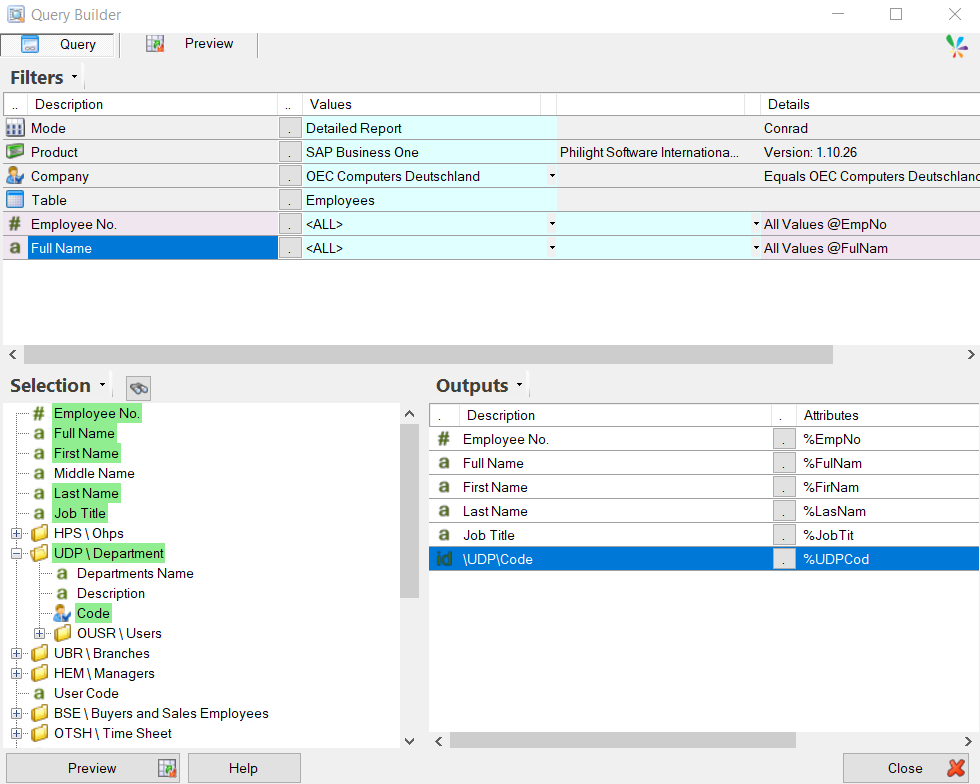
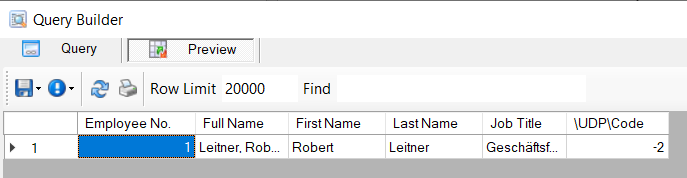
When the field with the security filter is selected as an output, the preview of the query should be limited in what it displays based on the security role.
Using Apply Based on Filter Settings
The ‘Apply based on Filter Settings’ checkbox allows the creator of a report to set whether the security roles are applied based on a filter.
In this section of the article, this functionality will be demonstrated through creating two dashboard tiles; one with the filter set to true and another with it set to false. While the demonstration uses a Dashboard, this functionality does not require a dashboard.
After creating a Security Role, enable ‘Apply based on Security Roles’. This means that you have the option of creating a filter in queries that enables or disables the security role for that query.
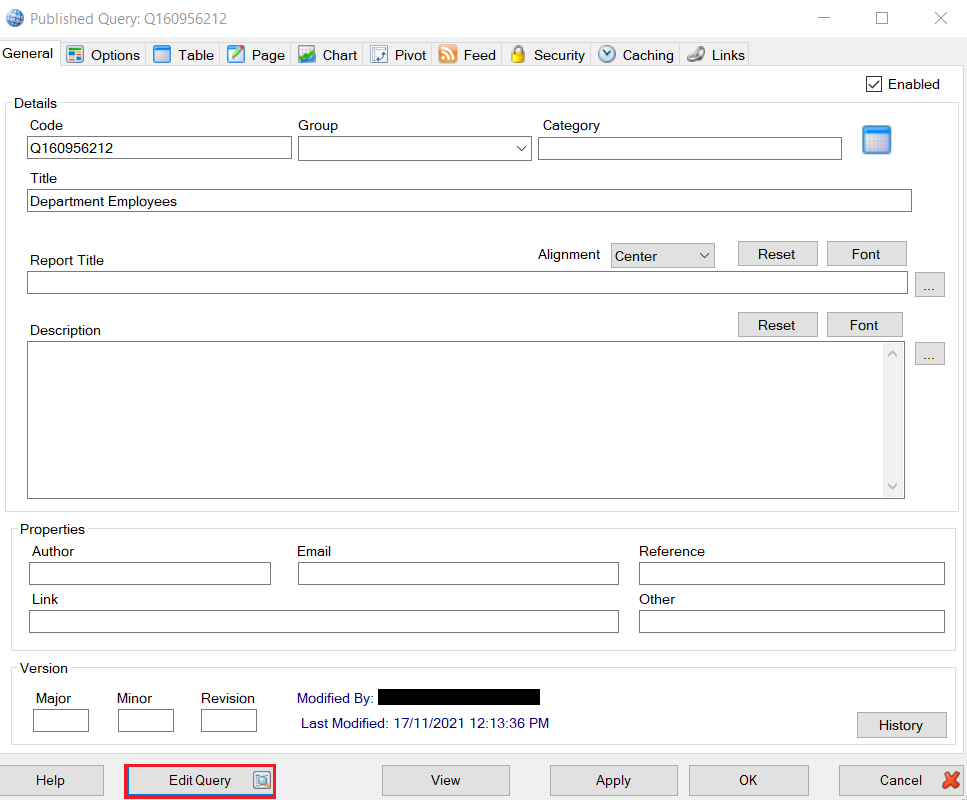
Next, create a Published Query. Set the title and select ‘Edit Query’
Add the desired outputs to the query, ensuring they include a field managed by Security Roles.
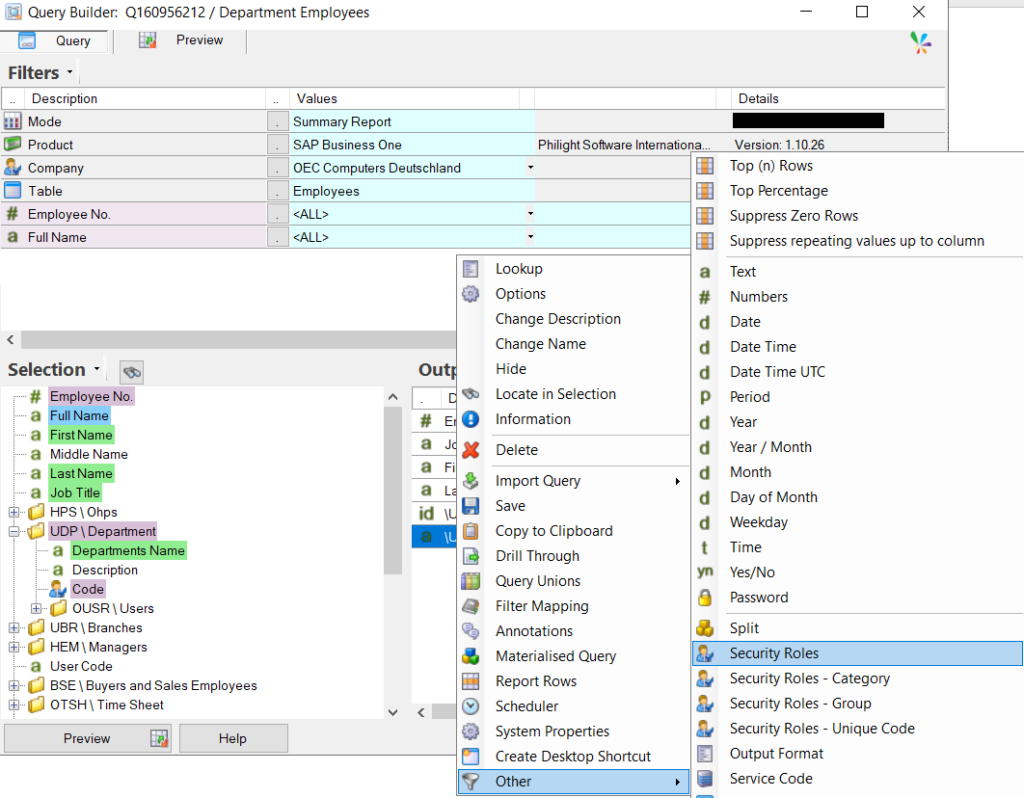
Right click on a filter in the query, select ‘other’, then ‘Security Roles’. Accept the default name, and the new filter should be created.
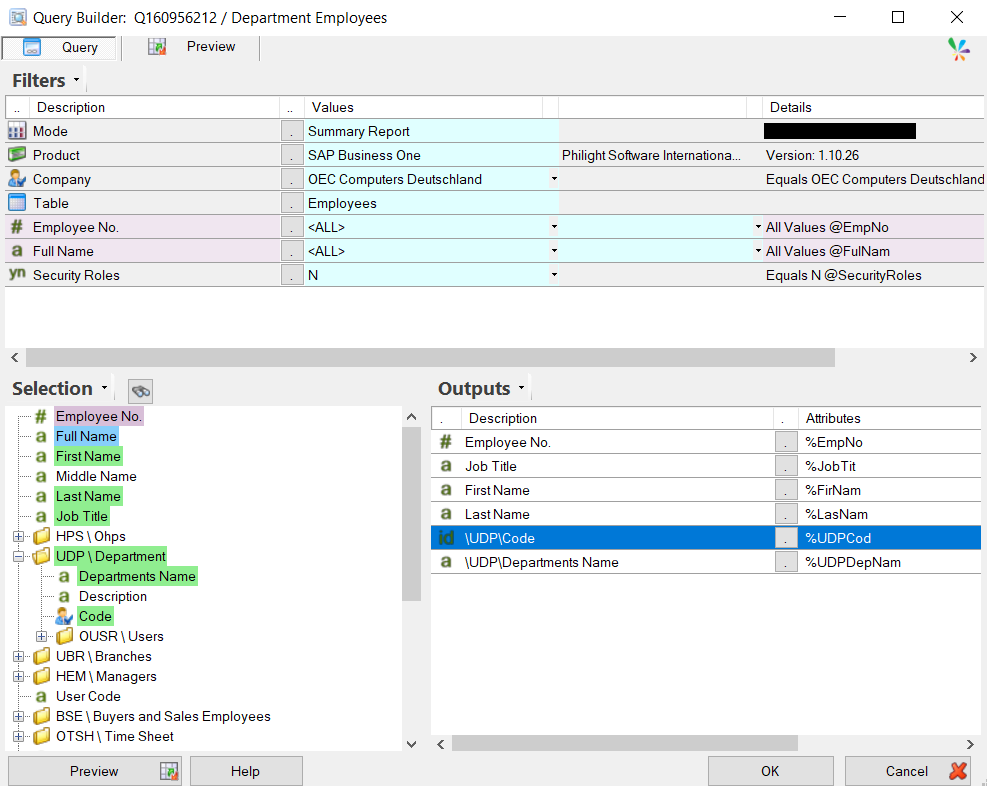
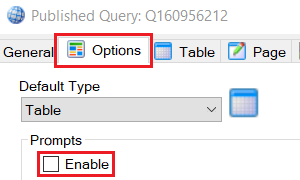
Select ‘OK’, then go to the ‘Options’ tab in Publisher.
Deselect the ‘Enable’ checkbox under Prompts to prevent users from changing the Security Roles filter prompt. Select the ‘Submit by Default’ checkbox so the published report is executed automatically.
Then go to the ‘Links’ tab and copy the URL for the Report.

Start the Sharperlight Service via the Applications menu
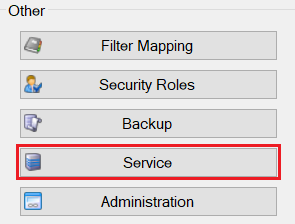
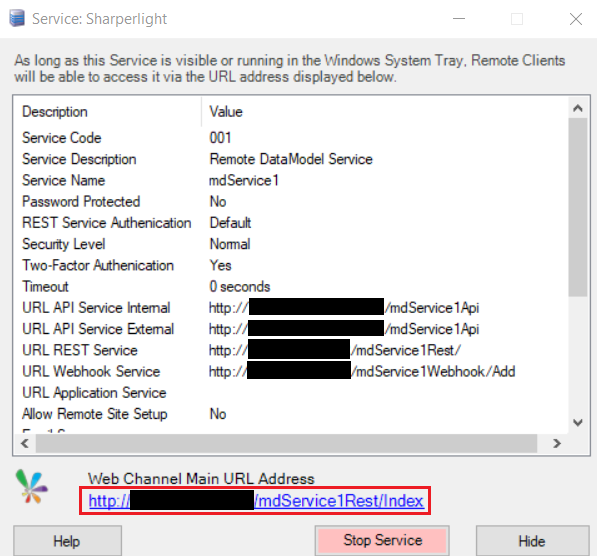
Access the Sharperlight Web Channel Index via the link in the Sharperlight Service. Ensure that the user you login as is affected by the Security role you wish to test.
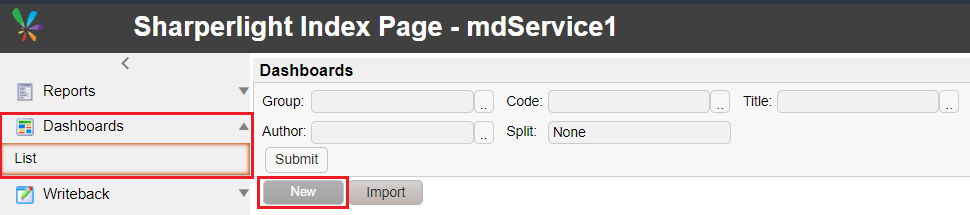
Create a new Dashboard by selecting ‘Dashboards’, then ‘List’, then ‘New’
Set the Title and Description, then under Tile, paste the URL from publisher into the field ContentURL, adding ‘&fltSecurityRoles=N’ to the end. This uses the Sharperlight REST Api to set the filter ‘SecurityRoles’ to ‘N’.
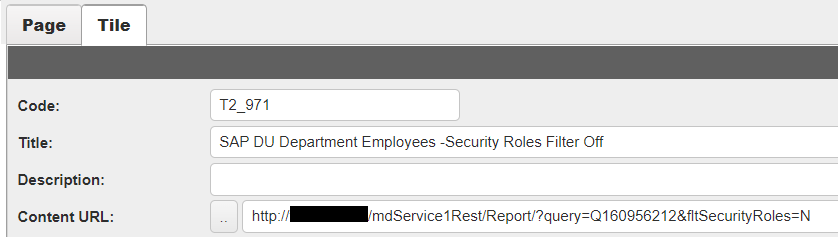
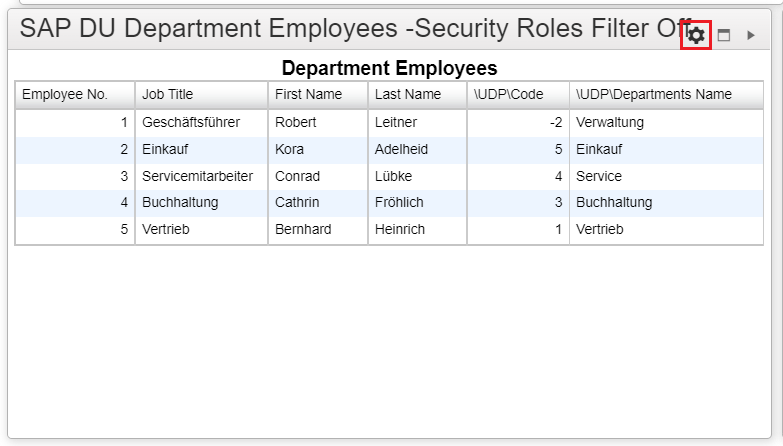
Select the ‘save’ button. The tile should display the same data as the query preview when SecurityRoles is set to N.
Hover the mouse over the tile and select the gear to open the editor again. Create a new tile by selecting the ‘New’ button at the bottom of the page, then set the Content URL to the same Published Query URL, but add adding ‘&fltSecurityRoles=Y’ instead.
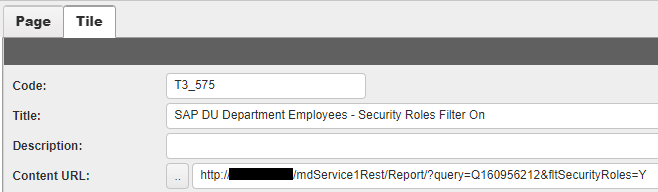
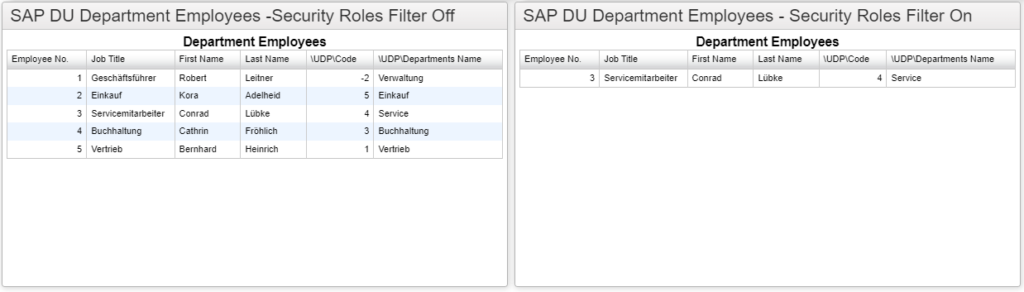
Select Save, then view the difference between the reports with the filter off and with the filter on. The filter is applied when the field ‘SecurityRoles’ is set to ‘Y’, and not applied when it is ‘N’.
Advanced Filter Rules
This section will describe the advanced functionality of Filter Rules, including methods of delimiting items, reserved values, conditional logic, System Properties and general recommendations.
General usage
Filter Rules can be delimited by either Commas or Pipes. This means that “a,b,c” and “a|b|c” are both valid lists of values for Filter Rules.
Filter Rules have several reserved values. These are ‘<null>’, meaning the value is NULL, ‘<blank>’, meaning the value is empty, and ‘<like>’, which is followed by a string using ‘%’ as a wildcard. For instance, the rule ‘<like>M1%’ will allow all values starting with ‘M1’, applying to both ‘M101’ and ‘M150A’, but not ‘M201’. This uses the Like command in SQL, meaning that more advanced functionality is possible but varies based on the type of SQL database used. For more information on possible functionality, view your SQL Database’s documentation.
Using NOT based logic and/or exclusion lists is not recommended, as it easily creates logical errors.
Conditional Formatting
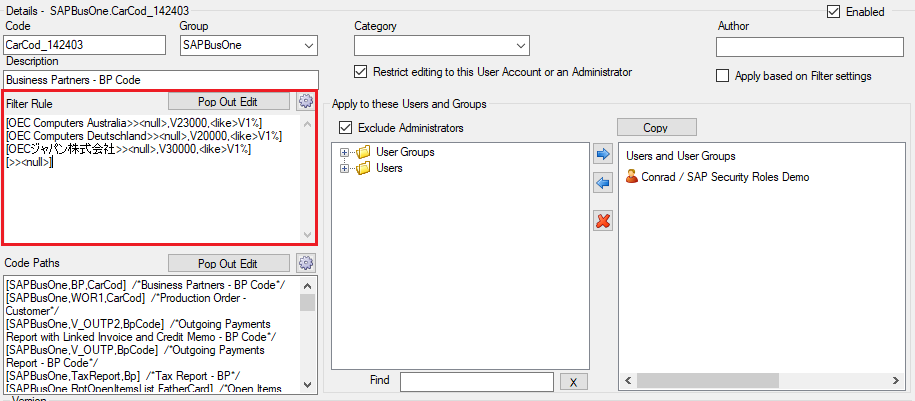
Filter rules can be used with a syntax similar to Filter Mapping, although it is not the same as Filter Mapping (See this article for more information regarding the Filter Mapping Syntax). This allows different rules to be applied based on the superfield of the datamodel (i.e. Company for SAP). This can be useful if the codes for an item are configured differently for different companies (i.e. an account code is 1000 for the UK company, but 8000 for the US company). In the following example, the Sharperlight Sample SAP database is used. The Driver for these conditions is always the Super Field of the database. For instance, in SAP and Business Central, it will be Company.
These rules filter results are based on the Business Partner Code, with different sets of rules for different company names. To accomplish this, each company is enclosed in square brackets. The company name is followed by two angle brackets “>>”, followed by the list of allowed values, in a manner similar to ‘[CompanyName>><null>,a,b,c]’, where CompanyName is the company’s name and a, b, and c are allowed values. The default rule is used if the company name is not found, formatted with no company name in a manner similar to ‘[>>a,b,c,<null>]’.
The following example uses the Sharperlight Sample SAP Database, available here.
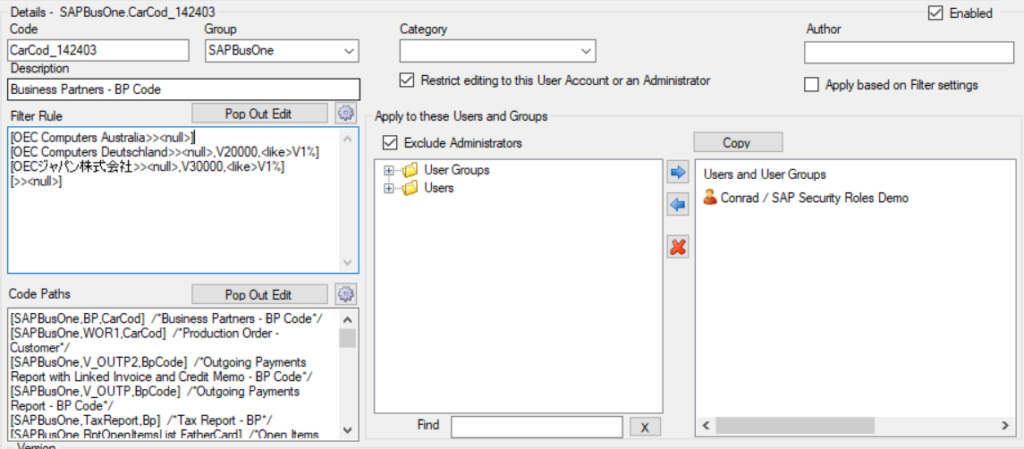
The below set of rules can be interpreted as follows, applying only to the user ‘Conrad’:
- For all companies, allow Business Partner codes starting with “V1”.
- For the Australian company, also allow the code “V23000”.
- For the German company, also allow the code “V20000”.
- For the Japanese company, also allow the code “V30000”.
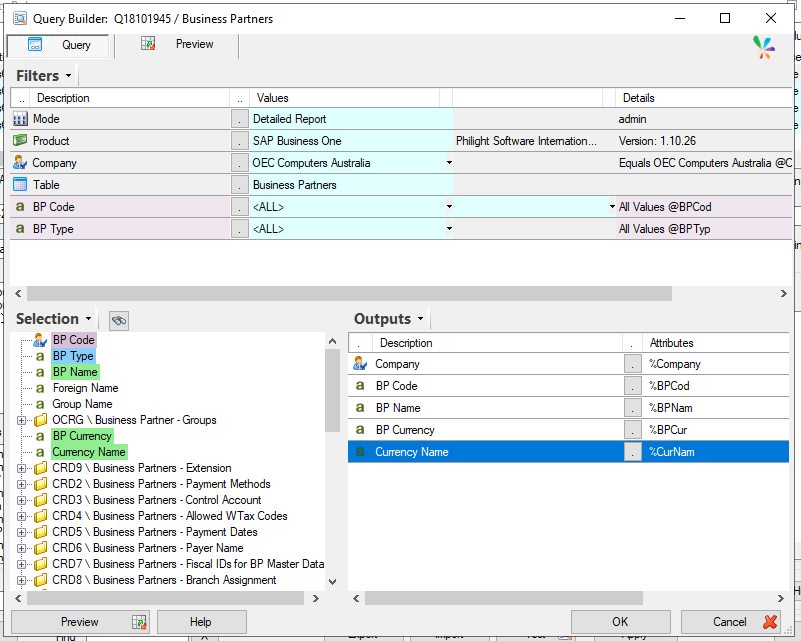
Below is the query used to test the new Security Role. It outputs the Company, and some details regarding the business partner.
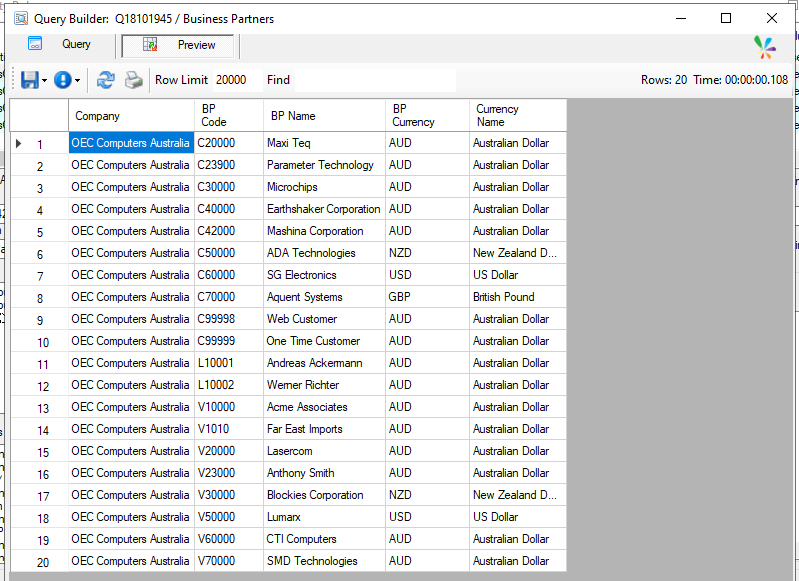
When previewed as an account that the security role does not apply to, the full list of business partners is displayed. After verifying this, switch the user account executing the query to one that the security role applies to.
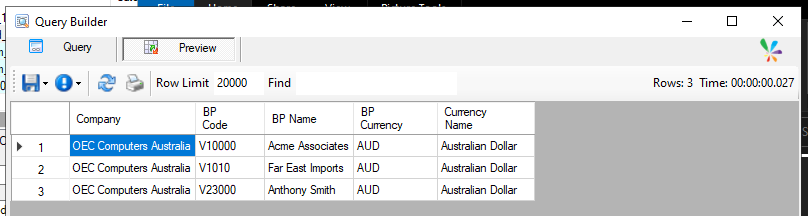
When the Australian company is previewed as an account the security role applies to, only company codes starting with “V1” and the code “V23000” are displayed, as per the created filter rules.
When the German company is previewed as an account the security role applies to, only company codes starting with “V1” and the code “V20000” are displayed, as per the created filter rules.
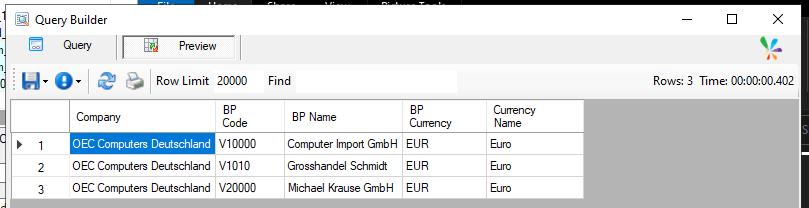
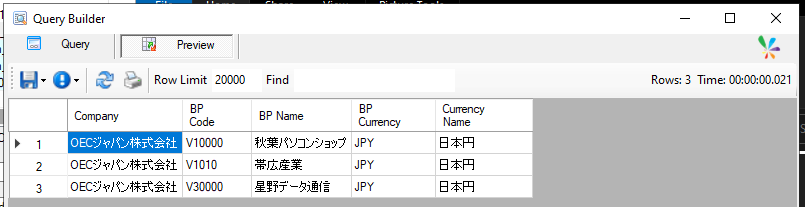
When the Japanese company is previewed as an account the security role applies to, only company codes starting with “V1” and the code “V30000” are displayed, as per the created filter rules.
System Properties
System Properties are variables stored in the Sharperlight System, used to reduce the number of changes needed when updating items that have the same value. While these will likely be used more in Code Paths, they may also be useful when the same Filter Rules are used across several Security Roles.
An example might be using a person’s address in a report for some reason. If they move house, instead of modifying each report referencing the address, simply change the System Property describing the address, which is then referenced by the reports.
This example will be using the Security Role used in the Filter Mapping Section. Under the Filter Mapping for “OEC Computers Australia”, set the list of allowed values to “<null>”.
As seen in the preview of the published query used in the Filter Mapping Section, there is no data returned. This is because the user Conrad is only able to view records with a Business Partner Code of NULL.

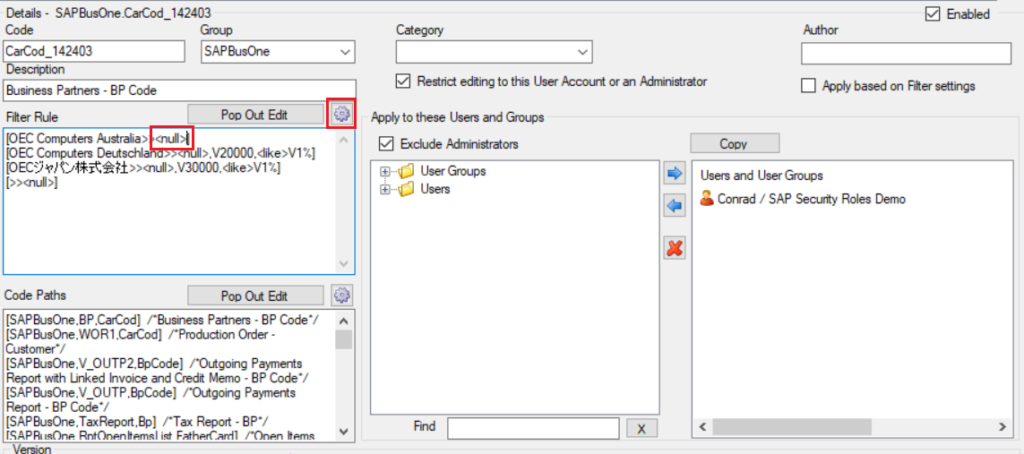
In a Security role, place the caret where you wish to enter the system property. In this example, it is after <null> under the Filter Mapping for OEC Computers Australia. Select the gear icon above the Filter Rule panel to open the system properties window.
In the new window, select ‘New’, enter a unique and meaningful code, select the data type, enter the value, then save it and press ‘Ok’. In this example, the value will be the list used in the Filter Mapping section of this article.
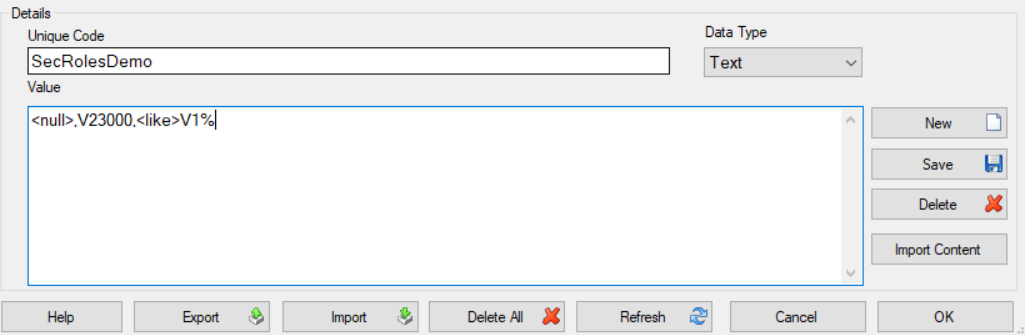
The system property should be added to the filter rule where the cursor was.
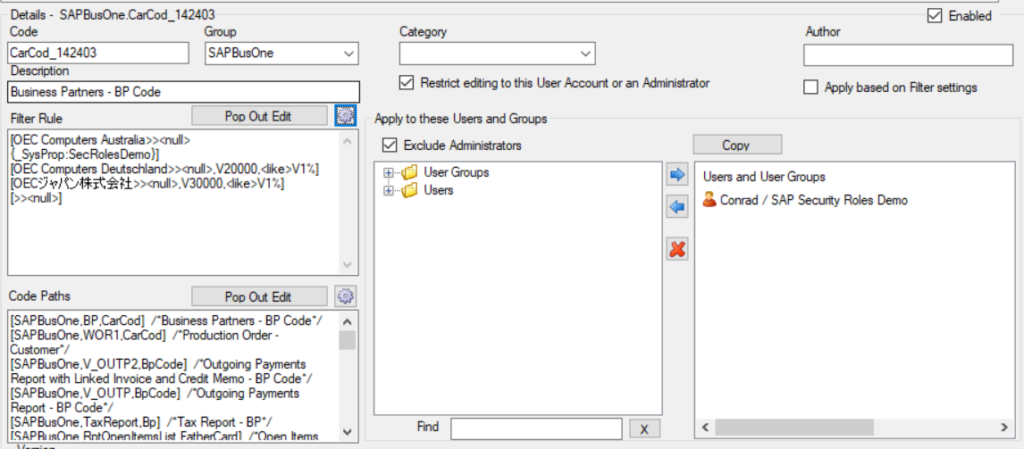
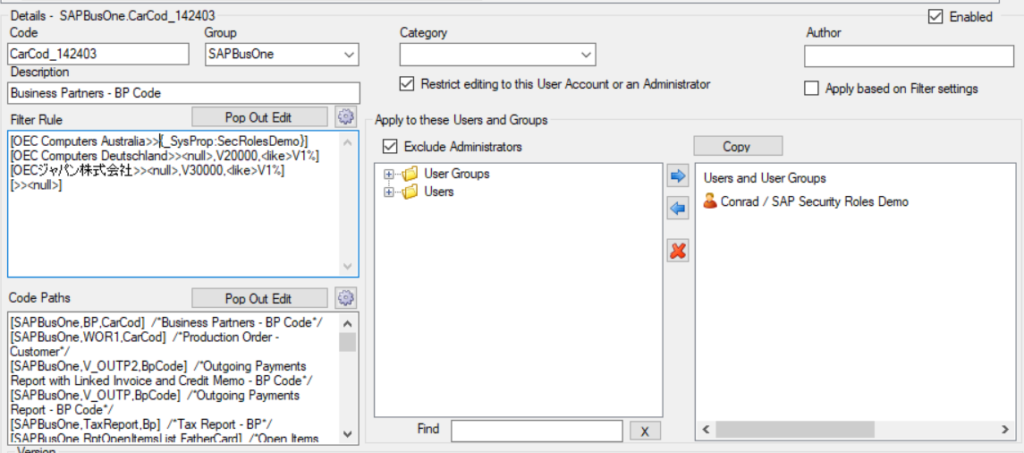
Delete the ‘<null>’ after ‘OEC Computers Australia>>’, having the System Property being the only item in the list for OEC Computers Australia.
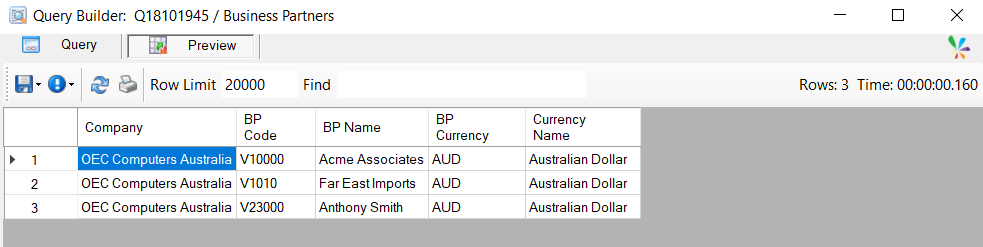
As seen below, the published query now returns the expected records, demonstrating how to use System Properties in Filter Rules.
Usage of Code Paths
Code Paths are used to define what fields the security role applies to. Note that it is not possible to include multiple filtered fields in one security role, as this would overcomplicate the syntax and process of creating Security Roles.
Code paths are automatically generated if the Security Role was created through a query filter lookup, and is otherwise visible in Query Builder when right clicking on a field and selecting Information.
Code Paths can use System Properties to easily create multiple security roles for the same set of fields. For instance, you could create multiple security roles filtering Business Partner Code, one for the sales department and another for the accounting department. If a materialised query is created using that field, it would, by default, not be filtered. When the Code Path is added to the System Property, it will then have the Security Roles applied to it.
The below example describes creating a materialised query, finding the code path of a field, adding the code path to a security role, and converting the security role to use System properties for the code paths.
The first step is to create the data for the Materialised Query. This can be achieved through using the Published Query used in Filter Mapping, previewing it, right clicking the table and selecting ‘Save as Excel CSV’
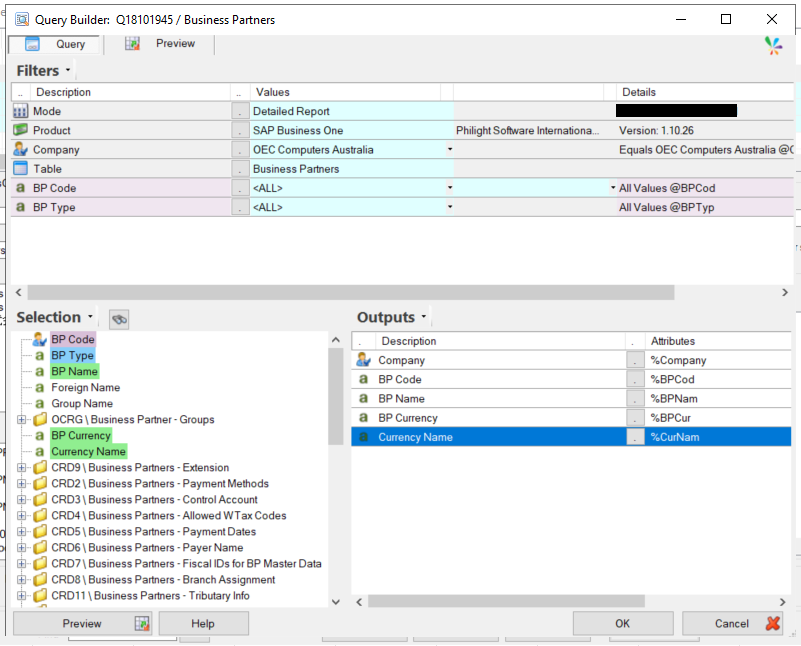
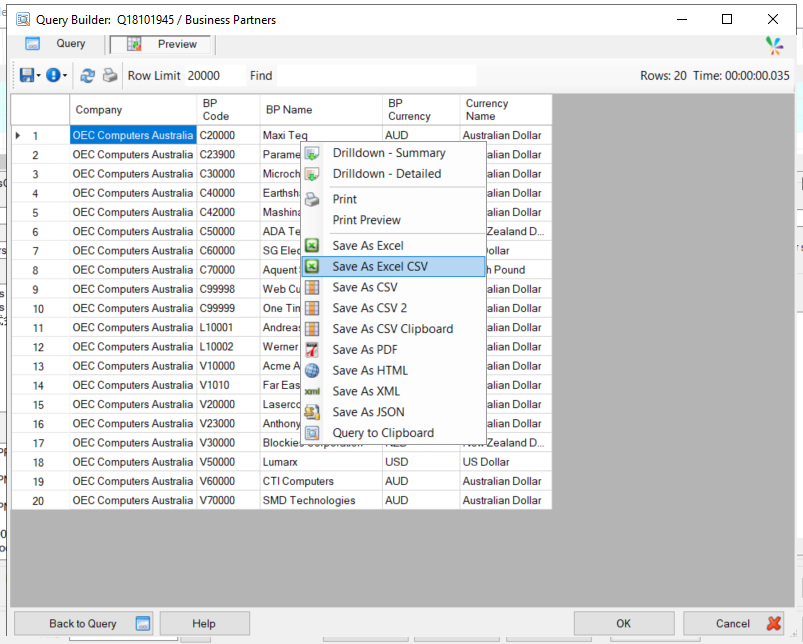
After creating the CSV File, open it in an editor such as Microsoft Excel and change the data for the purpose of the demonstration.
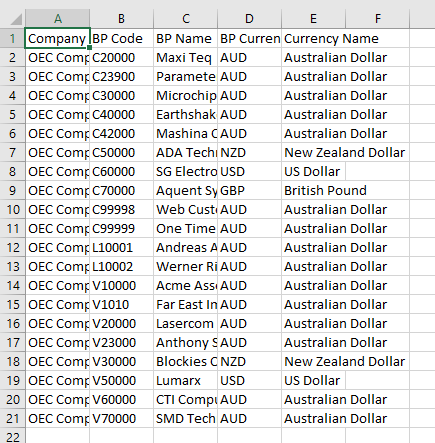
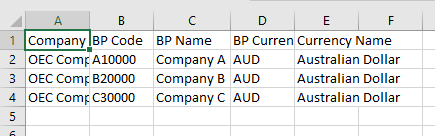
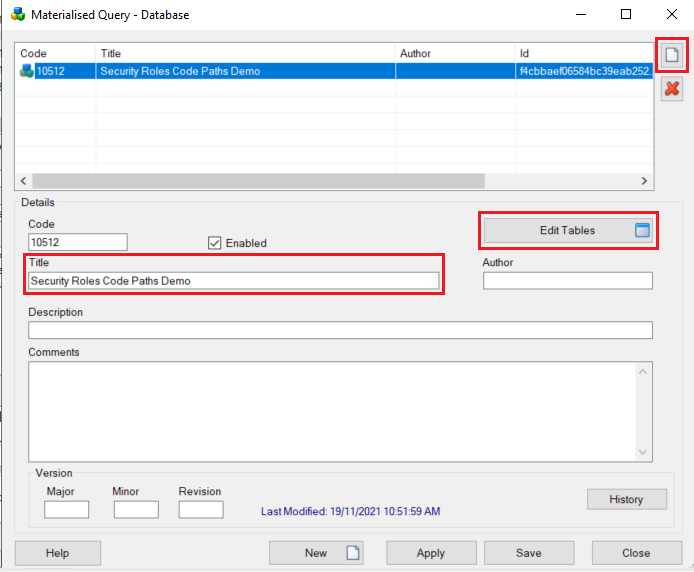
Open Materialised Query, create a new Materialised Query Database, name it and select edit tables.
Create a new Materialised Query Database, enter the title, then select ‘Edit Tables’
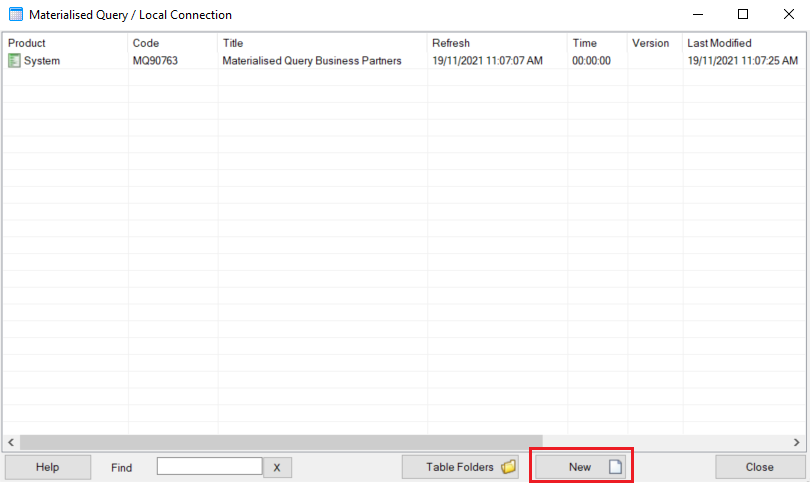
Create a new table in the Materialised Query Database.
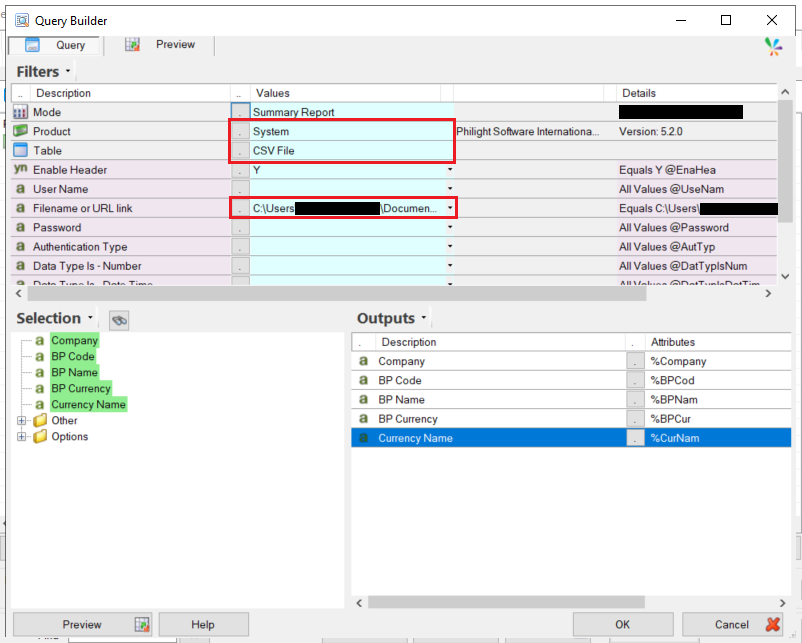
Set the product to System, the Table to ‘Other Data Source’ -> ‘CSV File’, set the Filename Filter to the edited CSV file via double clicking the filter value and navigating to the file. Right click one of the items in Selection, and select ‘Output All’.
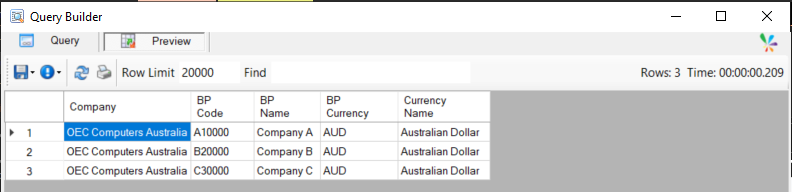
Select Preview to confirm that the data from the edited CSV File is present
The next step is to determine the code path of the BP Code field.
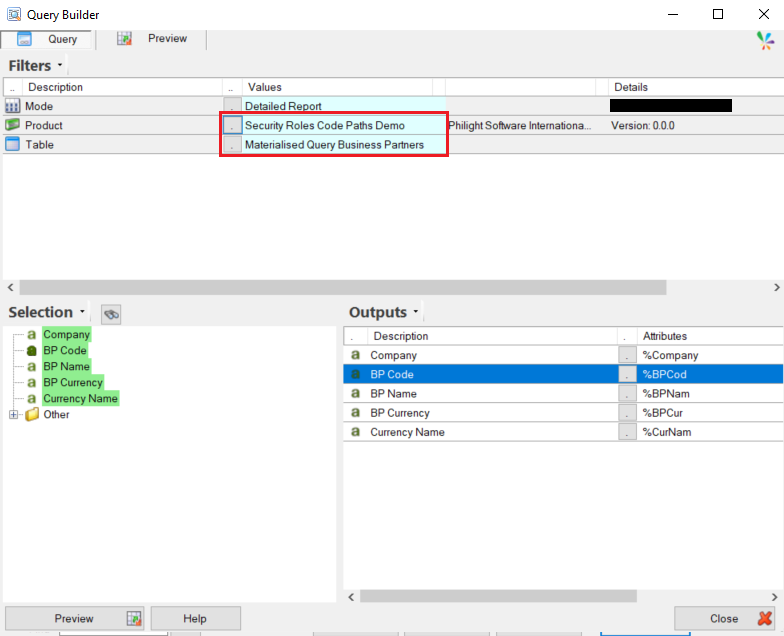
In Query Builder, set the Product to the Materialised Query, the Table to the created Table, and right click the field that the Security Role will be applied to (i.e. BP Code), selecting ‘Information’ on the popup menu.
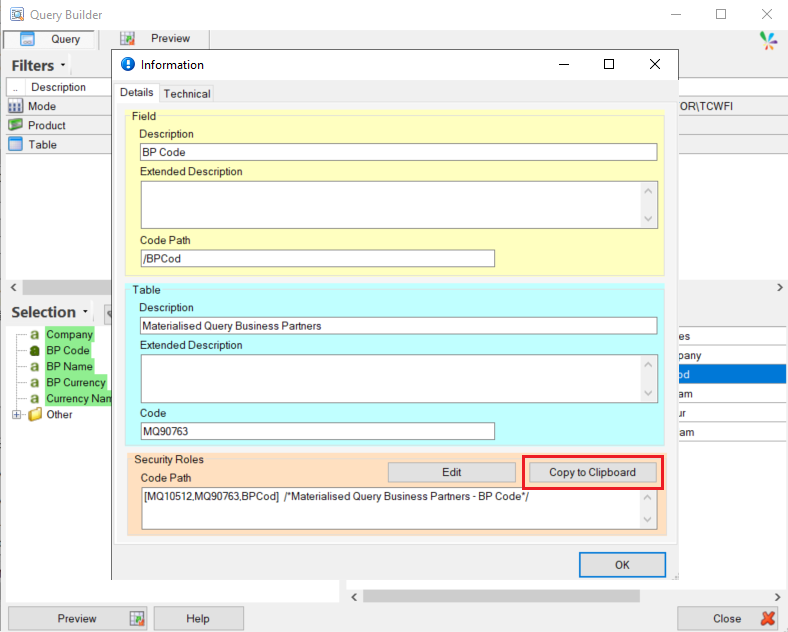
In the Information popup, the Code Paths are visible at the bottom of the window. Select “Copy to Clipboard”.
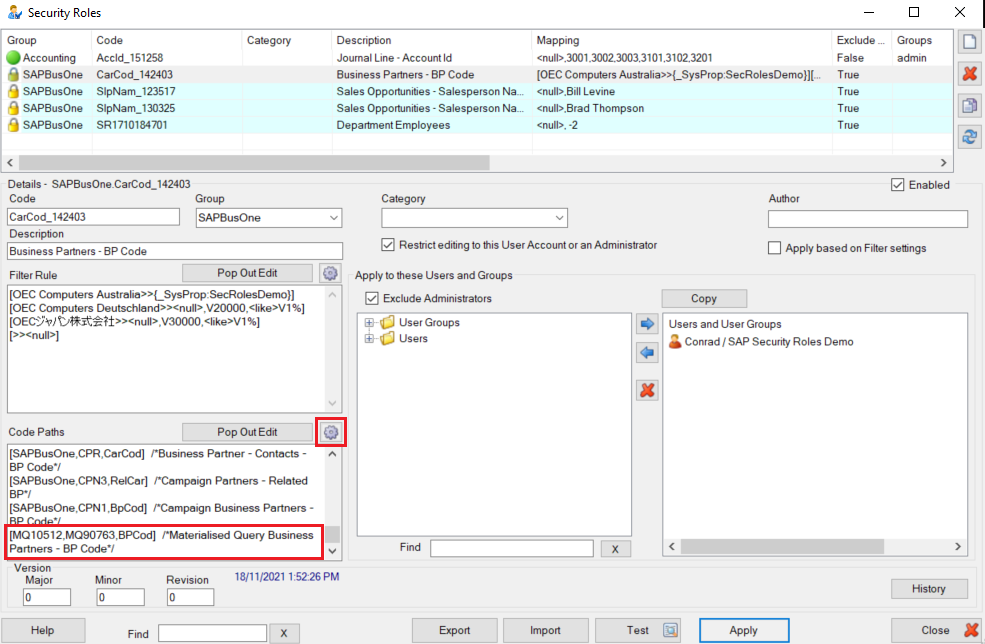
Go back to Security Roles and paste the Code Path into Code Paths. While this will work if it is configured correctly, it may be useful to complete another step and migrate the Code Paths to a System property, especially if the same set of code paths are used in multiple security roles (i.e. Conrad is allowed to view a certain set of business partners, while Charles is allowed to view another). To do this, copy or cut all the content in Code Paths and then select the Gear icon
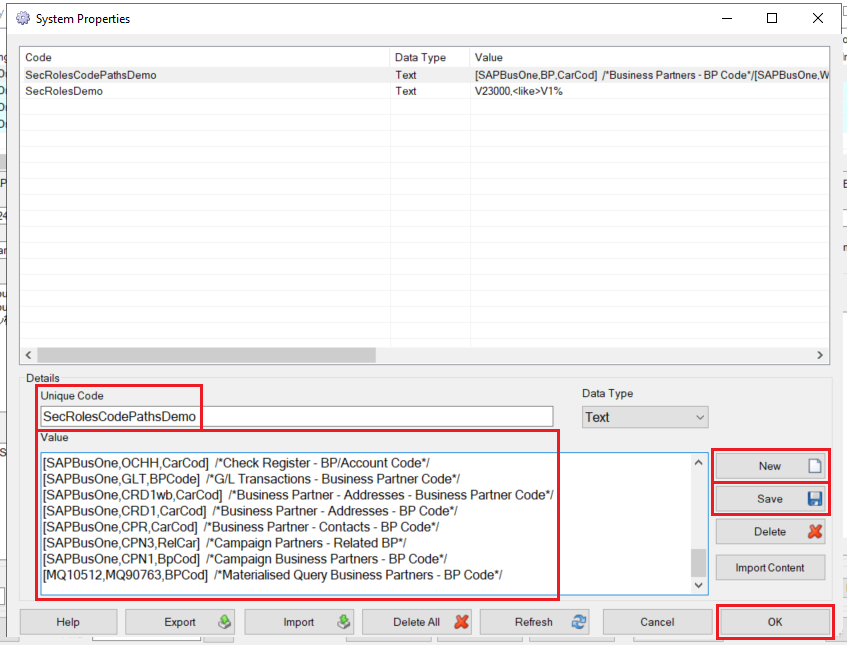
Select New system property, change the Unique Code to be meaningful, paste the Code paths into the Value textbox, then select save. A new row in the table should appear. Select Ok to go back to Security Roles once complete.
The System Property should be inserted into Code Paths where the caret was. Delete the rest of the content. For this example, Conditional Filter Rules were used. As the Materialised Query has no Super Field, the Materialised Query will use the logic in the Default rule (where the company name is empty). Add Filter Rules to allow some of the created records to be displayed.
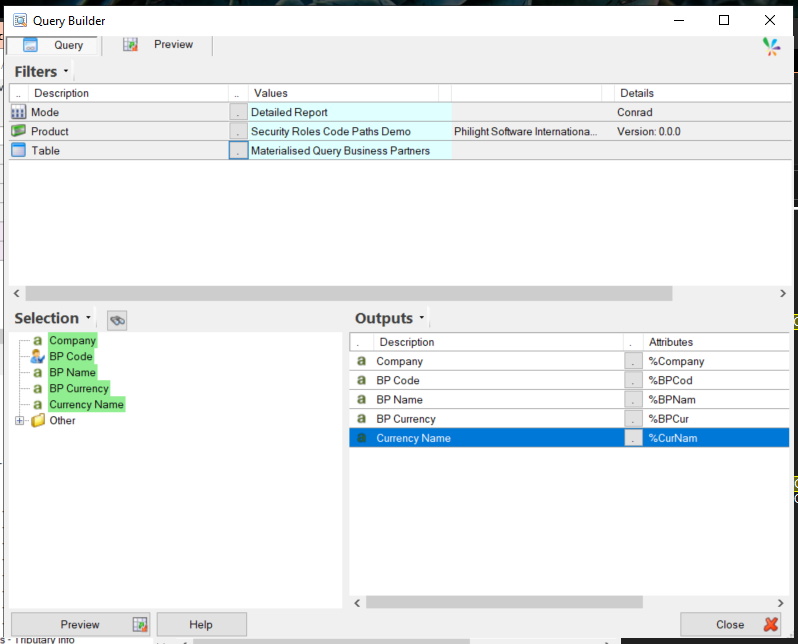
Open Query builder as a user that the Security Role applies to, holding shift as it opens to force the login page. Then create a new query using the table created in the Materialised Query, Ensuring the filtered field (i.e. Business Partner Code) Is in the outputs.
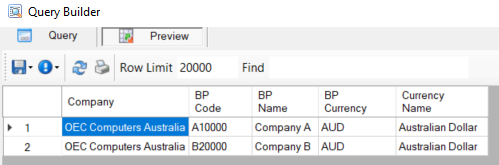
Select Preview to view the outputs. As seen below, the Security Role is being applied, preventing the user Conrad from seeing Company C with a BP Code of “C30000”, while allowing Company A and Company B.
Recommended creation and editing settings
The Restrict Editing to this User Account and Administrators option has been briefly covered earlier in this article. This option locks the security role so only Administrators and the creator are allowed to modify the Security role. This is a useful option that prevents other non-administrator users with the same permissions as the creator from tampering with security settings.
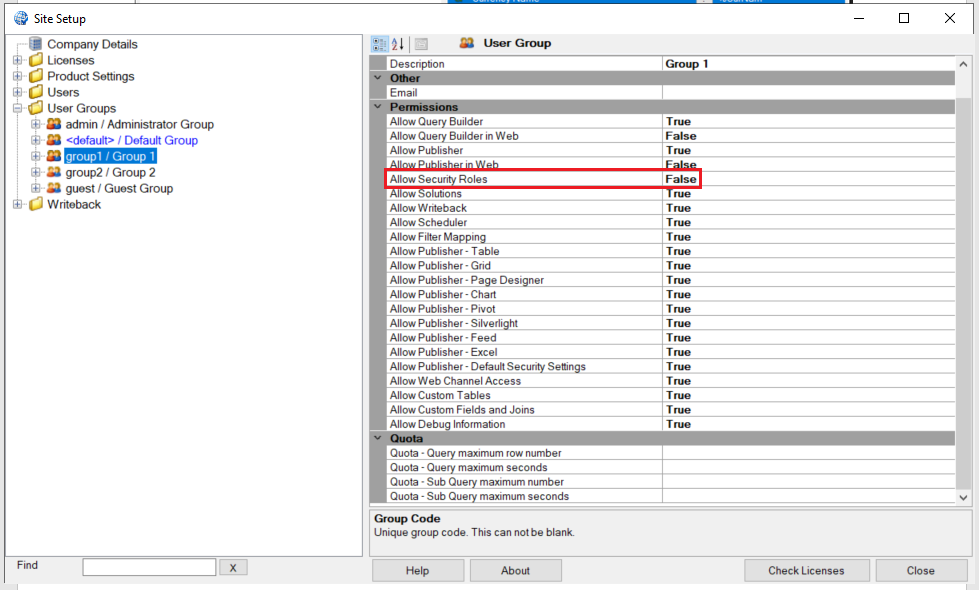
Under Site Setup, User Groups permissions regarding creating and editing Security roles can be set. Note that while this can be changed, Administrators will always have permissions to create and edit Security roles, even if they belong to the group. This can be useful if a group of users, for example managers, should create Security Roles, but other employees should not.
Summary
In this article, the Sharperlight 5.2 functionality of Security Roles has been discussed, with an overview of the functionality, and examples provided describing general use, Filter Rules and Code Paths. The recommended Security settings have also been covered.