Usage of the Google LDAP Service
Summary
This functionality allows users to populate Site Setup and authenticate Google Users via Google Workspace’s LDAP Service. This service can be obtained through either Google Workspace Enterprise or Google Cloud Identity Premium. The links to these products can be found here:
Google Cloud identity Premium:
https://cloud.google.com/identity/docs/editions
Google Workspace Enterprise Edition:
Content
Creation of the LDAP Service
Creation of the PKCS12 Certificate
Synchronising users in Sharperlight
Testing authentication of a single user in Sharperlight
Creation of the LDAP Service
The following URL Provides a guide to the creation of a Google LDAP Service
https://www.youtube.com/watch?v=-B5xf3qkLRA
This link provides further information:
https://support.google.com/a/answer/9048541
On completion of these tutorials, you should be able to view the LDAP service from Apps > LDAP > Settings for <LDAP Service Name>


Creation of the Certificate
The PEM certificate and key files (i.e. the .crt and .key files) created by the Google LDAP Service must be converted into a PKCS12 (.p12) file for use in Sharperlight.
The method to do this can be found in the first two steps here, under the header “ldp.exe (Windows)”:
https://support.google.com/a/answer/9190869?hl=en&ref_topic=9048334
As of 14/12/2020, this method is:
- Change the name of the certificate to something memorable in Google Admin’s LDAP manager (Under Apps -> LDAP)
- Download the renamed Certificate and Key file, moving them to the Sharperlight/bin folder.

- Install OpenSSL (One easy method is to install open-source package installer software, such as chocolatey, available at https://chocolatey.org/)
- Open Command Prompt and navigate to where you downloaded the .crt and .key files using the ‘cd’ command.
- Convert the certificate to a PKCS12 Formatted file using OpenSSL via the following command, where ‘ldap-client’ is the name of the certificate. Ensure that you remember the password you enter
openssl pkcs12 -inkey ldap-client.key -in ldap-client.crt -export -out ldap-client.p12

- Save the made PKCS12 (.p12) file in a safe location on the computer that is running the Sharperlight service.
- DO NOT PUT THIS IN A USER LOCATION, SUCH AS MY DOCUMENTS OR DESKTOP
- A good place to put this is in the Sharperlight bin folder (Usually Philight/Sharperlight/bin).
Synchronizing users in Sharperlight
- In Site Setup, right click any user underneath the ‘Users’ folder.
- The following menu should appear, select ‘Synchronize Users’ and ‘LDAP – Configuration’.

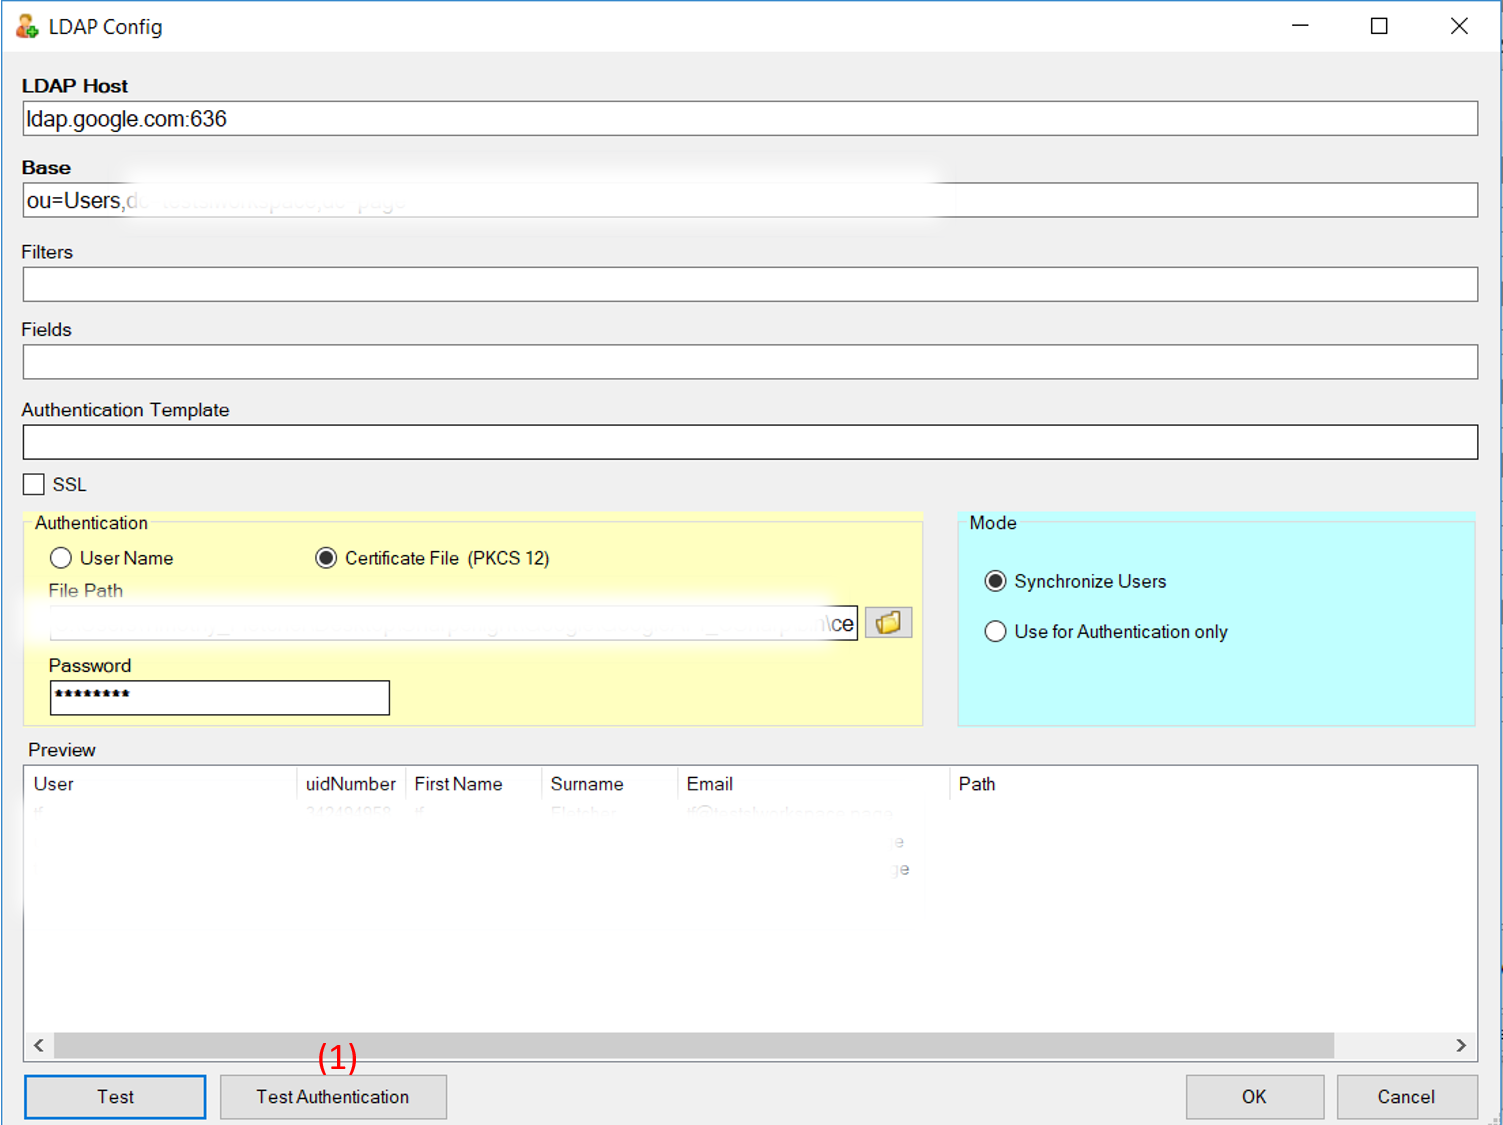
- This will open the LDAP Configuration Screen seen below:

- This is the LDAP Host, it should be ldap.google.com:636
- This is the Domain of your LDAP service.
- It can be accessed through Google Admin’s Domains -> Manage Domains.
- Do not include any periods and include “ou=Users” as well as all domain components.
- An example is “ou=Users,dc=sharperlight,dc=com” for “sharperlight.com”
- Ensure the radio buttons are set to Certificate File (PKCS12)
- Choose the Certificate created earlier in this guide from the file system.
- Enter the password used to create the certificate earlier in this guide.
- Press the test button to ensure that the details are entered correctly.
- If it succeeded, you should see a list of users where the number 7 is.
- Press OK once finished.
- On completion of these steps, in the Template User popup, Choose the template user that you want the LDAP users to behave like and press OK.
- You should now see the synchronized users in Site Setup under the ‘Users’ Folder.
Testing authentication of a single user in Sharperlight
To test Authentication of a single user, press ‘Test Authentication’ in the LDAP Config screen, then enter the uid (usually the characters before the @ of their google workspace email) and the password of the user to test. If it is successful, you should be notified with an ‘OK’ popup.