
Foundry – Getting Started
The Foundry is a light data modelling tool that combines the creation of the source tables, design of the Datamodel and the preparation of a web interface for data entry and enquiry. A project in the Foundry can be deployed multiple times, each iteration will wipe the existing tables, Datamodel and published queries. When the solution has been finalised, the Datamodel can then be enhanced in the Studio. A Foundry project creates the database, accompanying datamodel, sample published queries with a menu and any other resources uploaded to Foundry.
Before starting the Foundry process, it is important to plan and design the database, which includes identifying all the tables included, along with the respective fields and joins to other tables. This will greatly reduce the time spent creating the database in Foundry, and reduce the amount of revisions needed. Please refer to the Designing a Database – Basics post for a brief overview on how to design a database.

The first step when creating a Foundry project is to fill in the details section in the Product tab. These are the details of the database and datamodel that you will be creating in this project. They are mandatory and should always be filled in first. There are also many useful other non essential options in the Product tab that can be explored.

The next step is to create the tables in the database. Dimension tables should always be created before the Fact tables, as the Fact tables will most likely need to have joins to the Dimension tables.
To create a new table, navigate to the Tables tab and click the new button at the top right of the screen. The user will then be offered the option to base the table on a query.
The output fields in the query will become the fields in the newly created table and the data generated from the query will be automatically written back into the table. This can be very useful if users want tables to be loaded with data automatically.
Users are also able to extract data from other existing datamodels and databases. However, if the data does not exist in a pre-existing datamodel, then they would have to enter it manually as shown in the Query image below, which can be a very long and arduous process depending on the amount and complexity of the data. Therefore, it may be better to create the table without basing it on a query and then writeback the data from an Excel worksheet at a later stage, after the Foundry project has been executed.

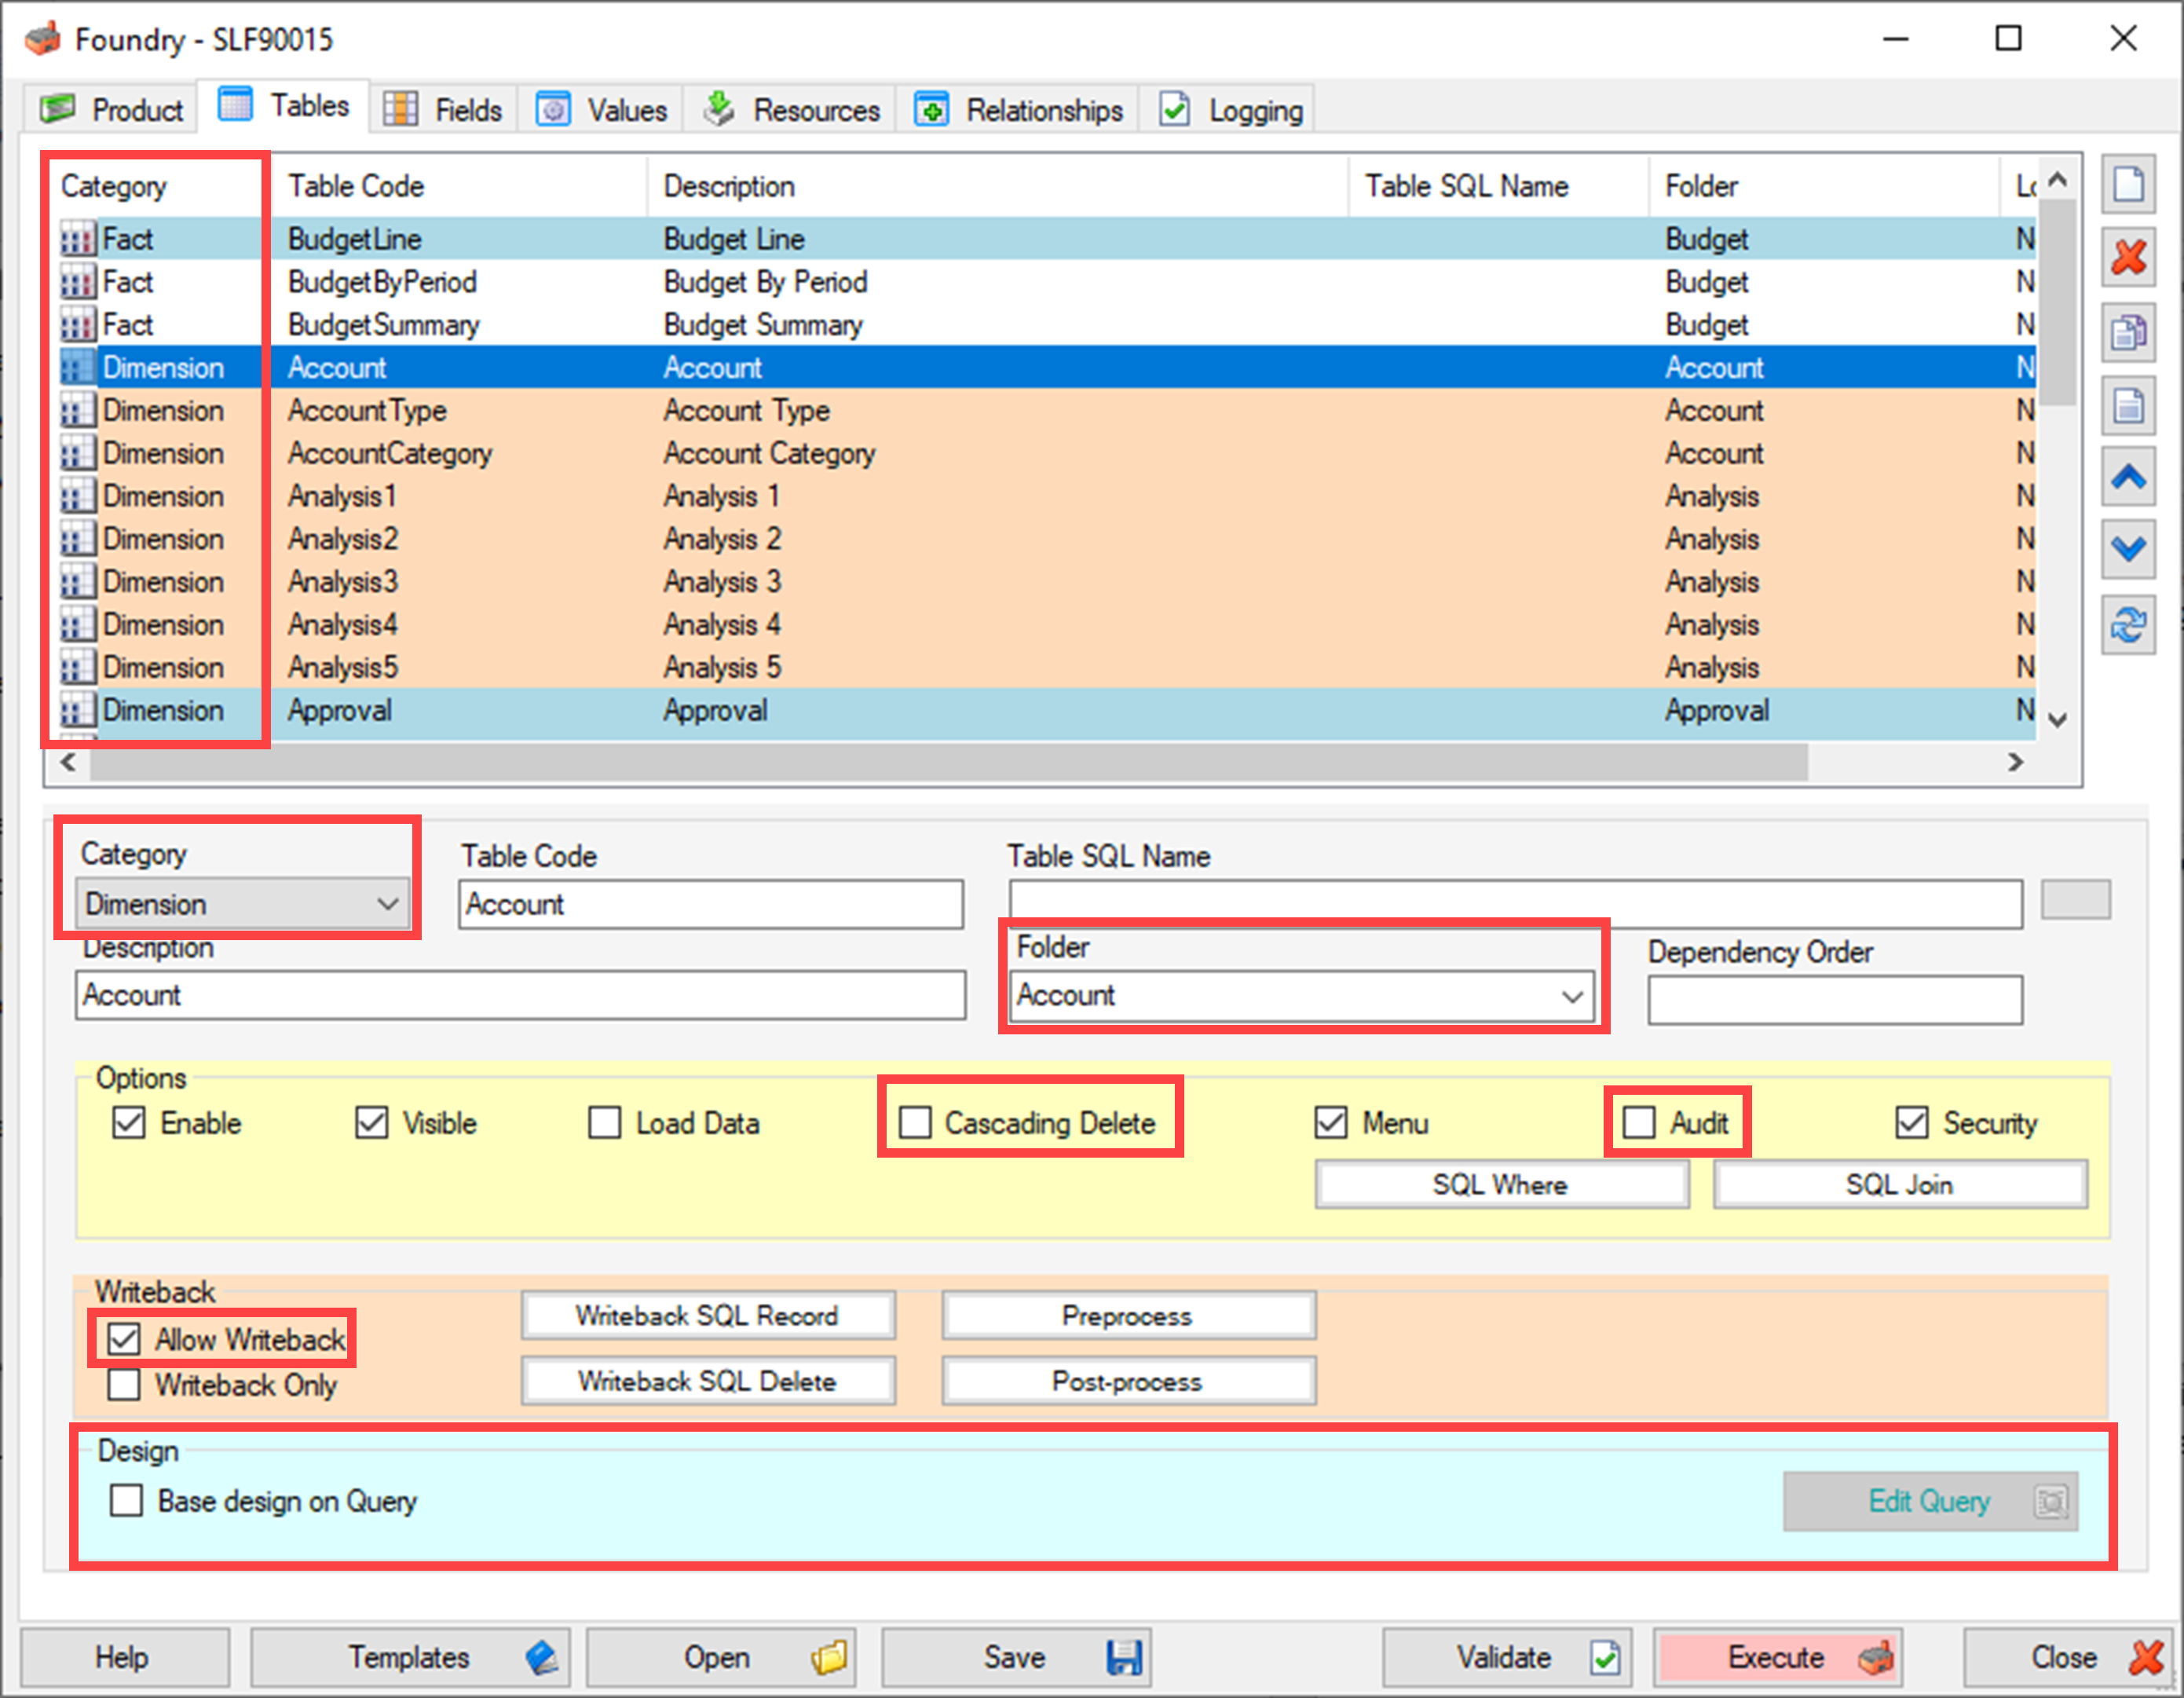
For each table, select the appropriate category (e.g. fact, dimension, etc.) and fill in the other details. There are many useful options in this tab, notably the ones listed below:
- Folder: Type the folder name, and it will group all tables with the same folder name together. The folder option becomes very useful when the database has many tables. The folders can be seen in the datamodel and in any table lookup.
- Cascading Delete: Databases created by Foundry by default have a protective measure in place that prevents users from deleting a record in a table if that data is referenced somewhere else, which prevents accidental removals and maintains data integrity. For example, an Employee from the Employee table cannot be deleted if that particular Employee exists in several records in the Invoices table. Without this measure, there would be inconsistencies where the Invoices table has Employees that no longer exist in the Employee table. However, by selecting the Cascading Delete option, it causes all records in all tables, that references that value, to be automatically deleted. For example, if an Employee was deleted from the Employee table, any records in the Invoices table with that Employee will also be deleted.
- Audit: This creates an Audit table that records all the changes made, the user who made those changes, as well as the date modified. This option is very useful in fact tables, where data can be updated multiple times.
- Allow Writeback: This option allows users to writeback/insert data into this table at a later stage through various sources, such as the web channel or Excel.
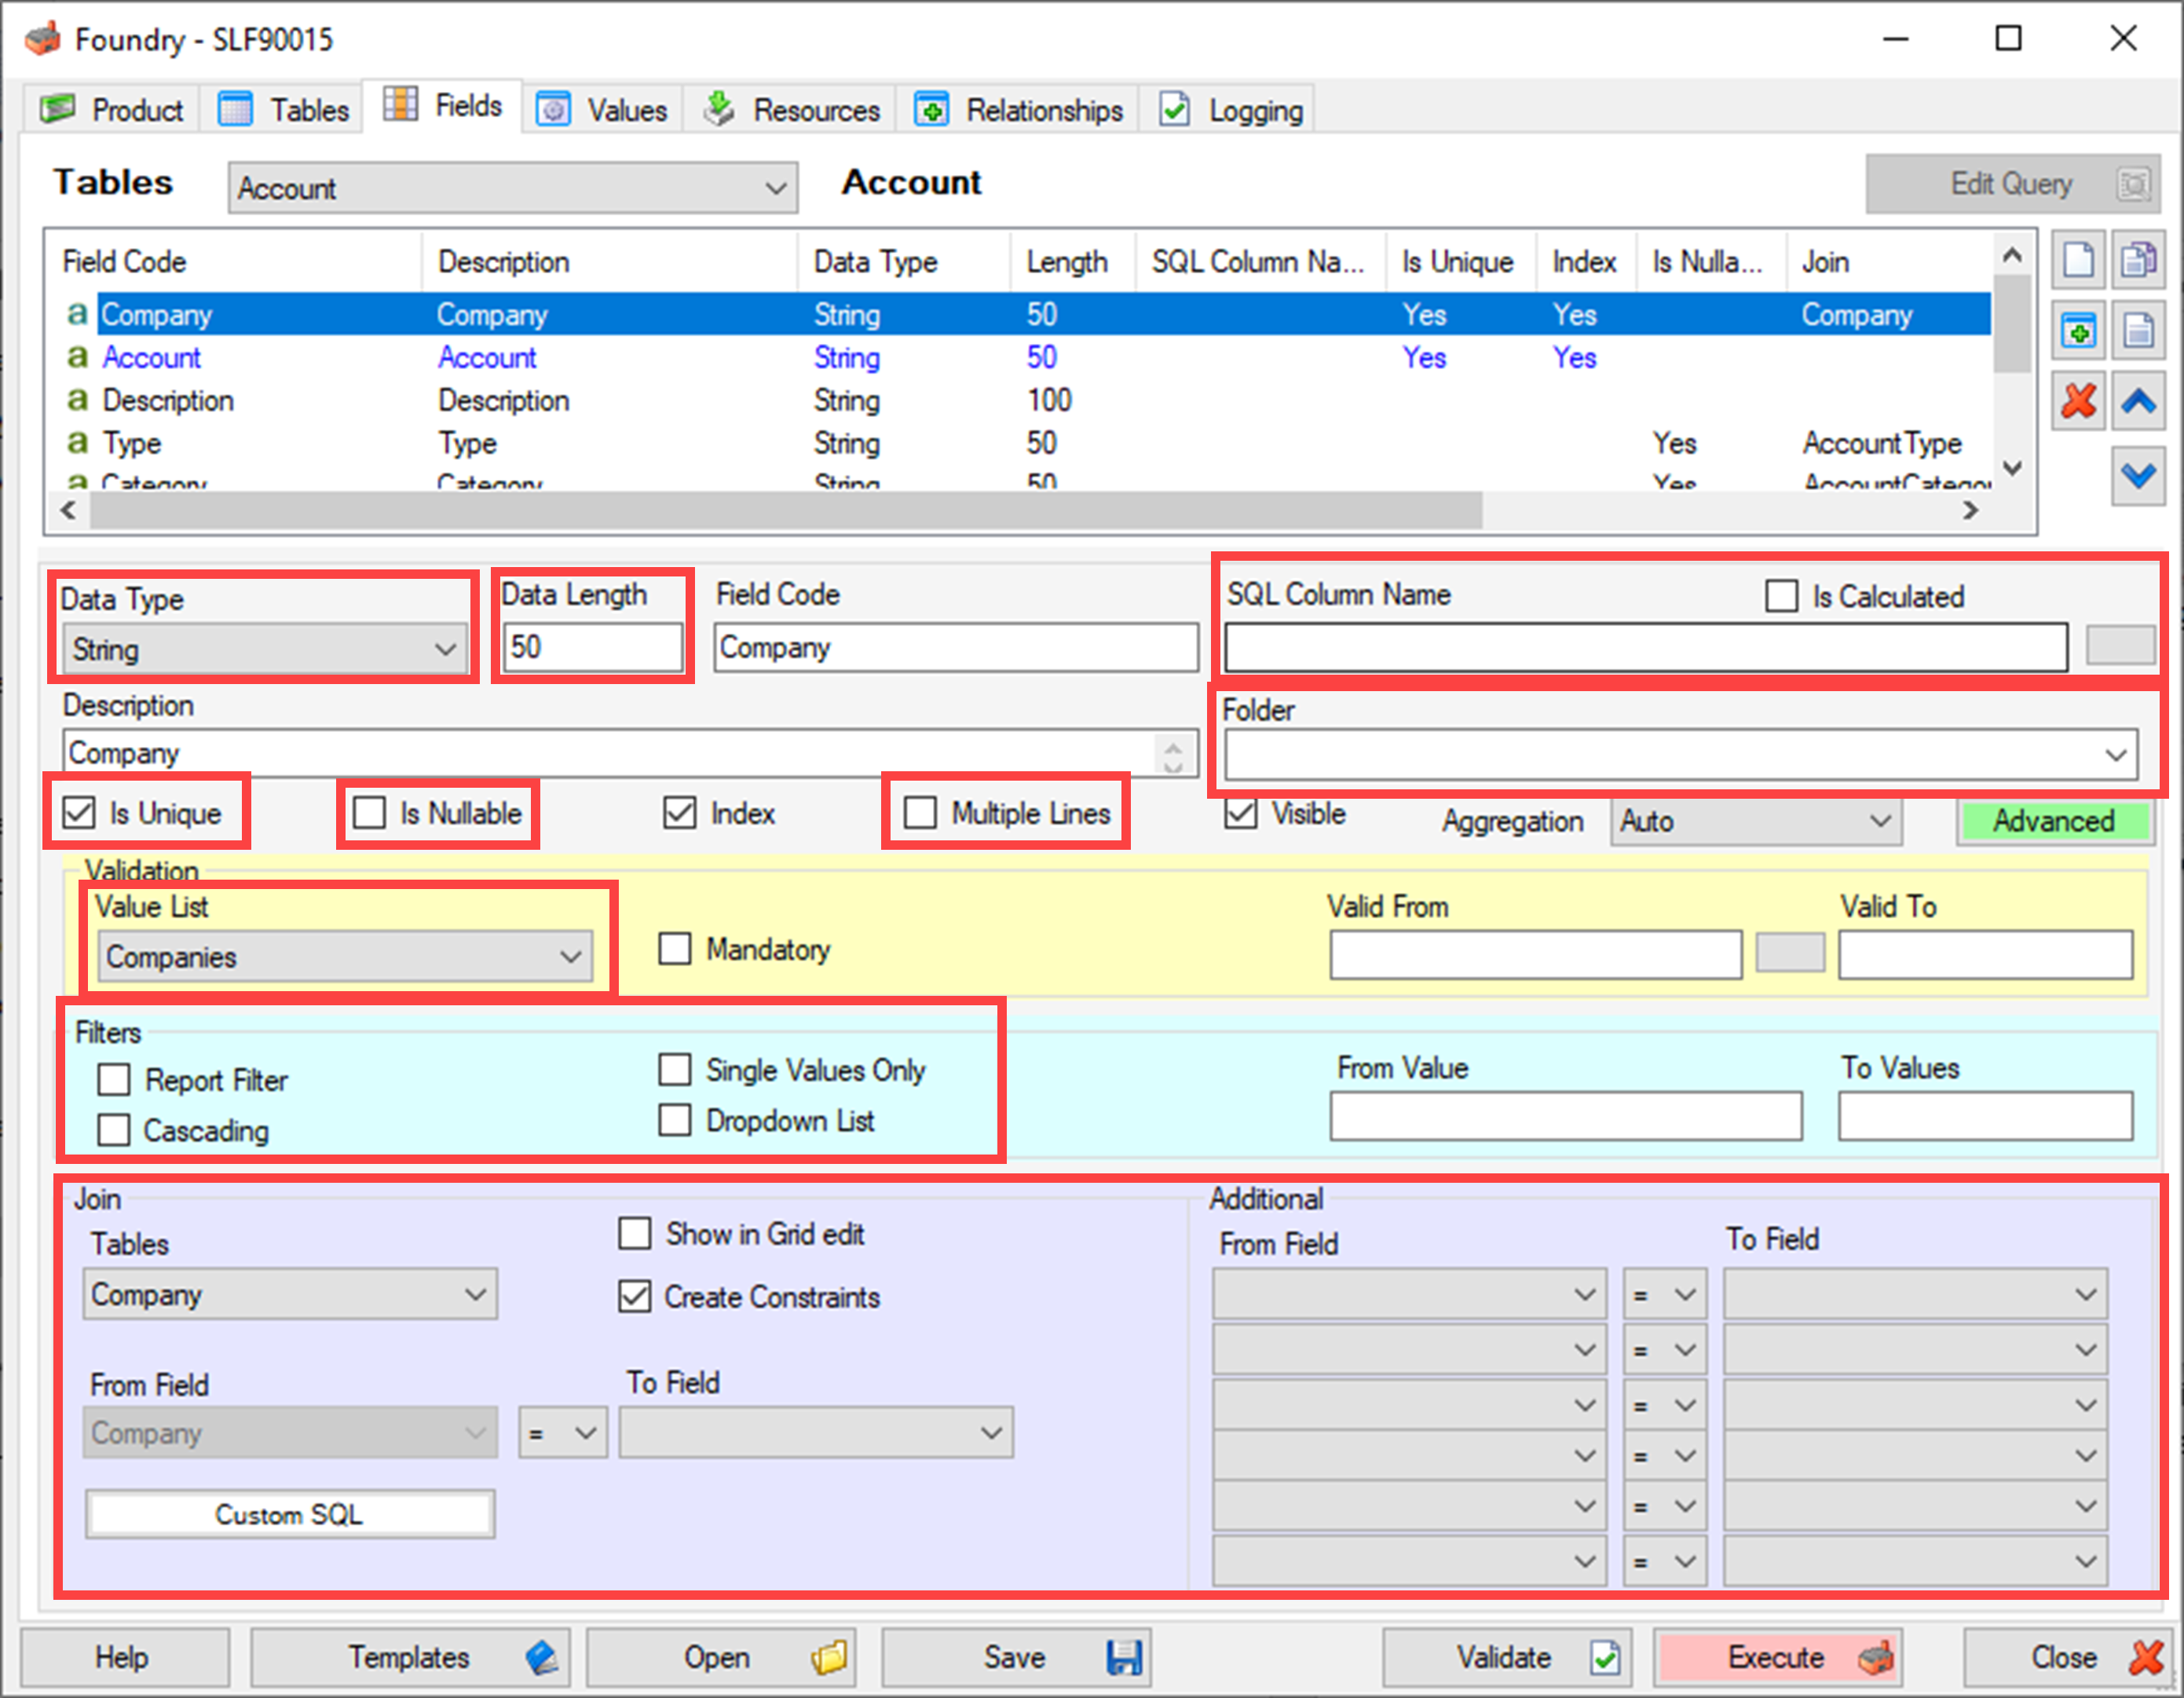
Once the tables have been created, the next step is to create the fields for each table. Go to the Fields tab and select the table from the dropdown. Click on the new button at the top right to create a field. Fill in the field details appropriately. Listed below are some of the important options that should be looked at:
- Data Type: Select the field’s data type from the dropdown. There are many different options to choose from, which covers all the different database data types.
- If the user wants to use Date Time as the data type, it is recommended that Date Time UTC is used, as this will standardize the time and remove confusion within the database due to different time zones. For example, if a writeback is performed in Australia first, and a few hours later, a second writeback is performed in the UK, users would expect that the date time stamp for the first writeback would be earlier than the second. However, since the UK time zone is behind Australia’s, this is not the case, which causes confusion and inaccuracy.
- There is also a data type called User Modified and Date Time Modified UTC, which can be very useful as it records the last user to modify the record and the date and time, they modified it.
- Data Length: This is used when a String data type is selected. When specifying the number of characters allowed, be generous as that will be the upper limit. If the field is Comments, Descriptions or something that requires a large amount of characters, it is best to leave it as MAX, instead of specifying a number.
- Is Calculated: Users have the option of creating a calculated field (i.e. allows users to use the other fields and perform a calculation or concatenation and output those values in this new field). For example, if there was a field called FirstName and another called LastName and the user wanted to combine them to create the full name, they would select Is Calculated ant type in: [FirstName]+” “+[LastName]. Please note that calculated fields can not be used as a join condition.
- Is Unique: This checkbox should be checked for the primary key (unique identifier) of the table. If it is a composite/compound primary key (multiple fields are needed to form an identifier), then this checkbox should be selected for all the fields that compose that key. As discussed in the Designing a Database section, every table should have at least one unique field/combination of fields.
- Is Nullable: Generally, this option should be left unchecked. It is only used in a few cases, such as the need to differentiate between 0 or null, blank or null, false or null, etc.
- Multiple Lines: This should be checked for fields like Comments or Descriptions, where the data length is set to max. It allows users to writeback on multiple lines.
- Value List: Allows users to specify what values are allowed to be inputted, and what those values mean. This lists are available to choose from can be specified in the Values tab.
- Report Filter: Every time this table is selected in Query Builder, the field will automatically be selected as one of the filters.
- Single Values Only: Only one value can be entered into the filter.
- Cascading: The filter values above this filter will affect the lookup and/or values that are available in this filter.
- Dropdown List: Instead of a lookup button when viewing in the web channel, the lookup will be displayed as a dropdown list.
- Join: If this field is to be used to join (connect) to another table, this area needs to be filled in. First, the table that is to be joined to, needs to be selected, then the fields in each table that will constitute the join needs to be selected (i.e. the Company ID field from the Budget table equals the ID field from the Company table). To the right, additional parameters can be included to form the join. This is very useful if the table that is being joined to, has a composite key (i.e. multiple fields are needed to identify the table).
- Data Type: Select the field’s data type from the dropdown. There are many different options to choose from, which covers all the different database data types.
The Value tab is optional. There are various different things that can be specified in this tab, depending on the type chosen. For the purpose of this basic guide, we recommend just using the Value List type, which will allow users to specify a list of values that are allowed in a field. Specify a code and then type the values permitted in a field and what they equate to. As mentioned above, to use this value list for a field, navigate to the field tab, select the appropriate field and choose the Value List in the Value List section.

The Resource tab is optional and allows users to upload Sharperlight items (e.g. published reports, dashboards, etc.) as well as files and folders. These items will be created and deployed when the Foundry project is executed. This is useful for providing sample reports or writeback data together with a Foundry project, which will create a more complete and ready to go package on a new installation.

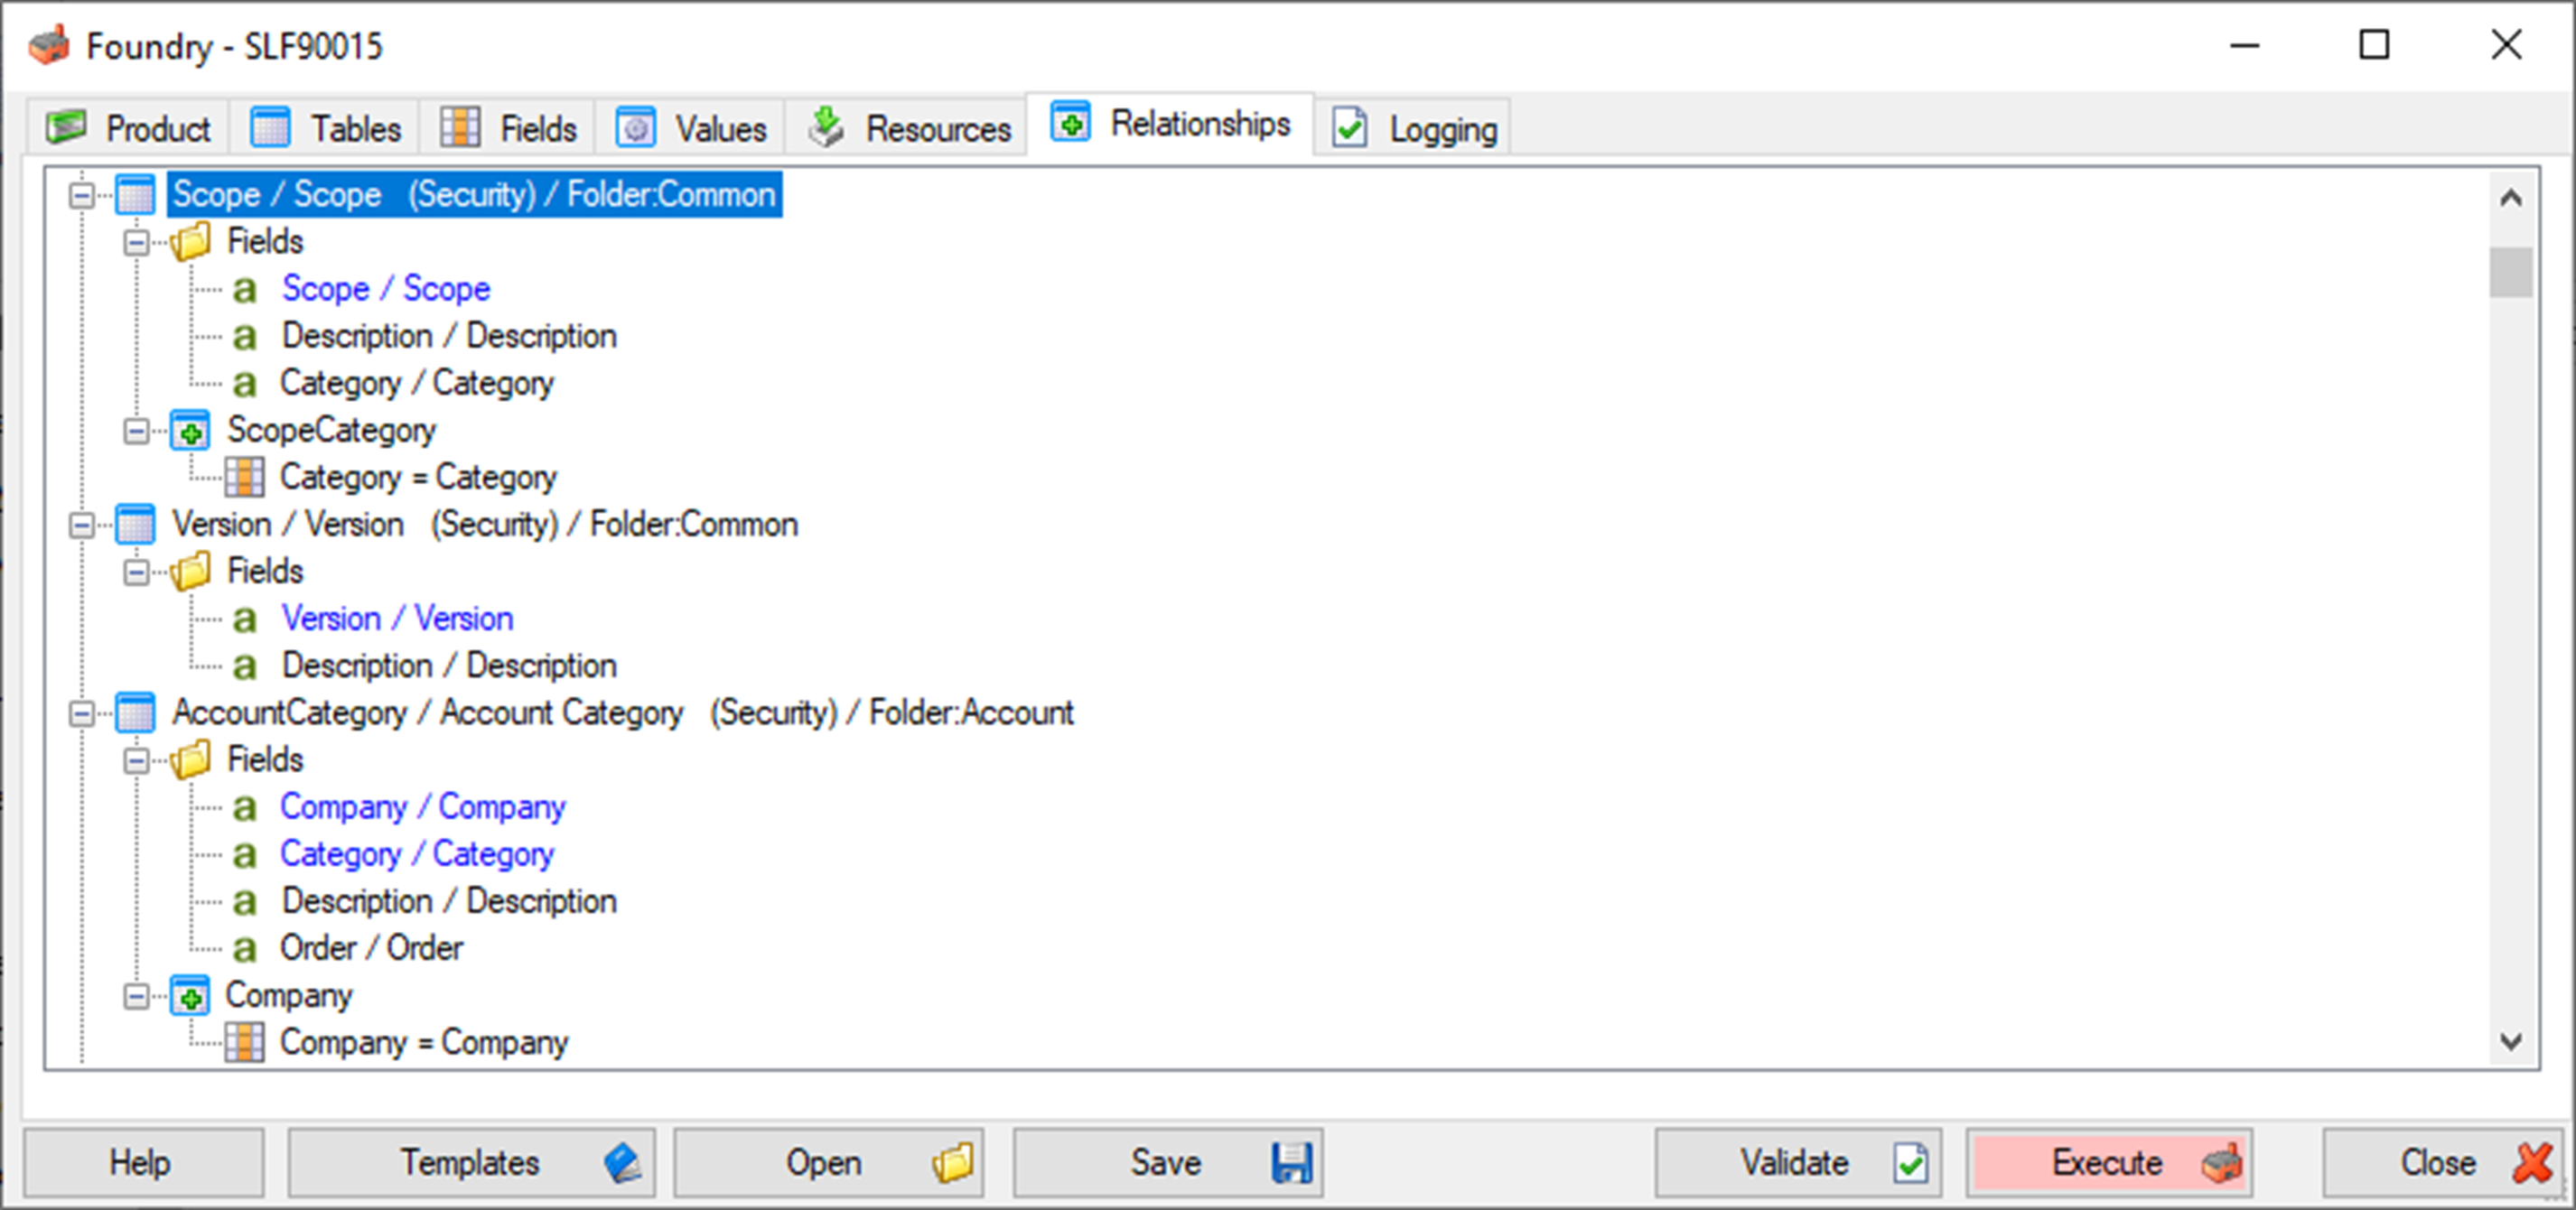
The Relationship tab allows users to see how the tables relate to each other. It shows each of the tables, their respective fields and their joins.
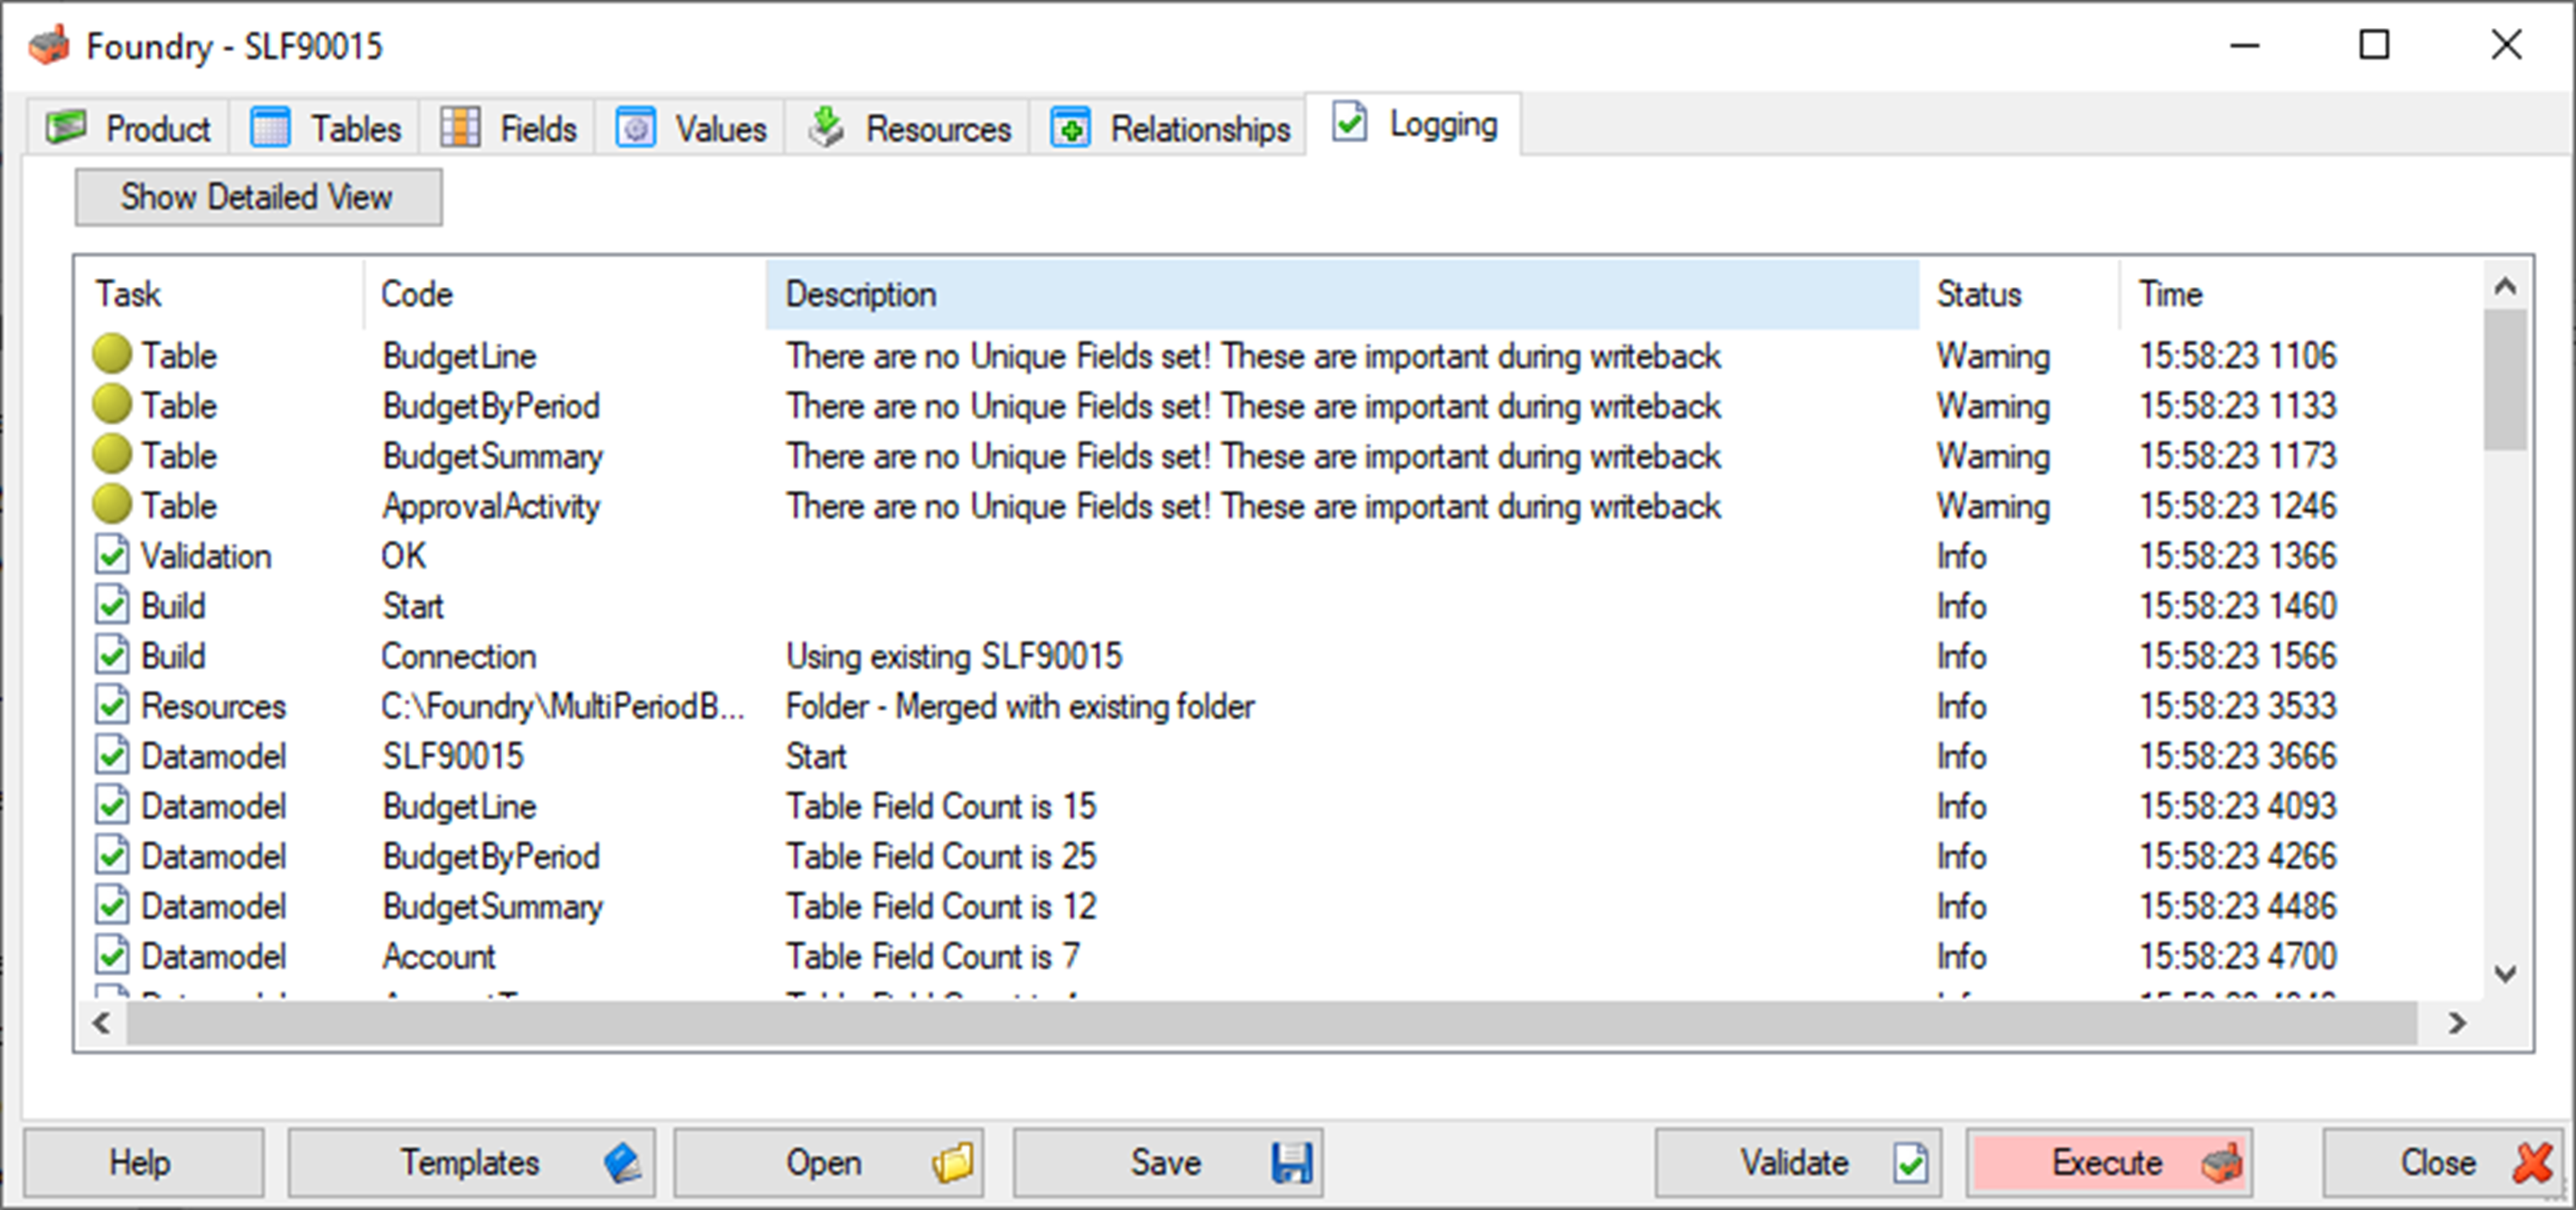
The Logging tab will display what is happening when the Validate or Execute button is clicked. This is very important as it shows the errors that arise as well, double clicking on such error will take the user to where the problem is in the project.
Be sure to save the project before exiting Foundry, as the Foundry project might need to be rerun with possible changes in the future. Executing foundry will delete any existing database with the same code and recreate the database in the foundry project. This means that any existing data and changes made to that database will be wiped.
Category: Foundry